Electric Longboard V3

I present my third electric longboard. It is a culmination of my manufacturing and design experience so far. After two years of nearly daily use and over 4000 miles, my previous electric longboard failed on me. The fiberglass and bamboo deck split down the middle. Even after trying to repair it with some high strength epoxy and aluminum plating, the board did not feel safe to ride on. Unfortunately I could not get my hands on another fiberglass and bamboo deck with the same shape, because the vendor discontinued that particular model. The deck was the main structural element for the entire longboard supporting the battery pack. The split on the deck bent the battery pack farther than it was designed to and disconnected some of the spot welds attaching the li-ion cells together. I found that some of the spotwelds came undone after I could not charge the battery pack due to a low voltage warning. Repairing the spot welds meant taking apart many of the other spot welds and tediously assembling the battery pack all together again. It was time to design a new electric longboard with a new battery pack.
I had a few design requirements for this longboard build. The first is that I wanted a more reliable deck that won’t degrade from high shock load over time. Another design requirement is that I wanted a larger battery pack than my previous 10s3p 21700 li-ion battery pack. The last design requirement is that I want this electric longboard to look one of a kind, instantly recognizable and completely different from anything currently on the market.
After having an off the shelf bamboo and fiberglass deck split on me mid-ride, I do not trust those materials for a high powered electric longboard anymore. However, I do still enjoy bamboo and fiberglass decks for general riding as it gives the most fluid steering and board feel out of any other deck material. Another option would be carbon fiber decks, which are quite stiff and reliable. Battery packs could also be mounted inside of the carbon fiber decks resulting in a really sleek overall electric longboard. The only downside and main reason I didn’t choose a carbon fiber deck is because they are extremely expensive, costing five to ten times as much as a traditional hardwood or bamboo and fiberglass longboard deck. As much as I would have liked to dip my toes into carbon fiber manufacturing, I didn’t have the time and I needed a working electric longboard before the start of the next semester to get around. However, I did acquire new manufacturing methods between when I built my last electric longboard and now. That is the use of the UNCC machine shop’s Haas CNC milling machines.
The structural deck material that I chose was 6061 aluminum. I had machined 6061 aluminum on the CNC mills before, so I had efficient speeds and feeds already calculated and tested. 6061 aluminum is fairly cheap and readily available, so ordering it for delivery was easy. After structural deck material was chosen, the entire design was driven by the material properties of 6061 aluminum.
As the shock load reference value for safety factor, an estimate of force resulting from hitting a 1 inch deep pothole at 35 mph was calculated. I have survived 1 inch deep potholes at lower speeds before, but the 35 mph used is a worst case scenario situation. With a safety factor of 3, I made sure that the aluminum deck design could withstand the shock loads. Creo simulate was used to validate that the deck would not permanently deform under these loads. I reduced the weight as much as I could and designed it with CNC milling in mind. This entire electric longboard was designed in Creo Parametric.
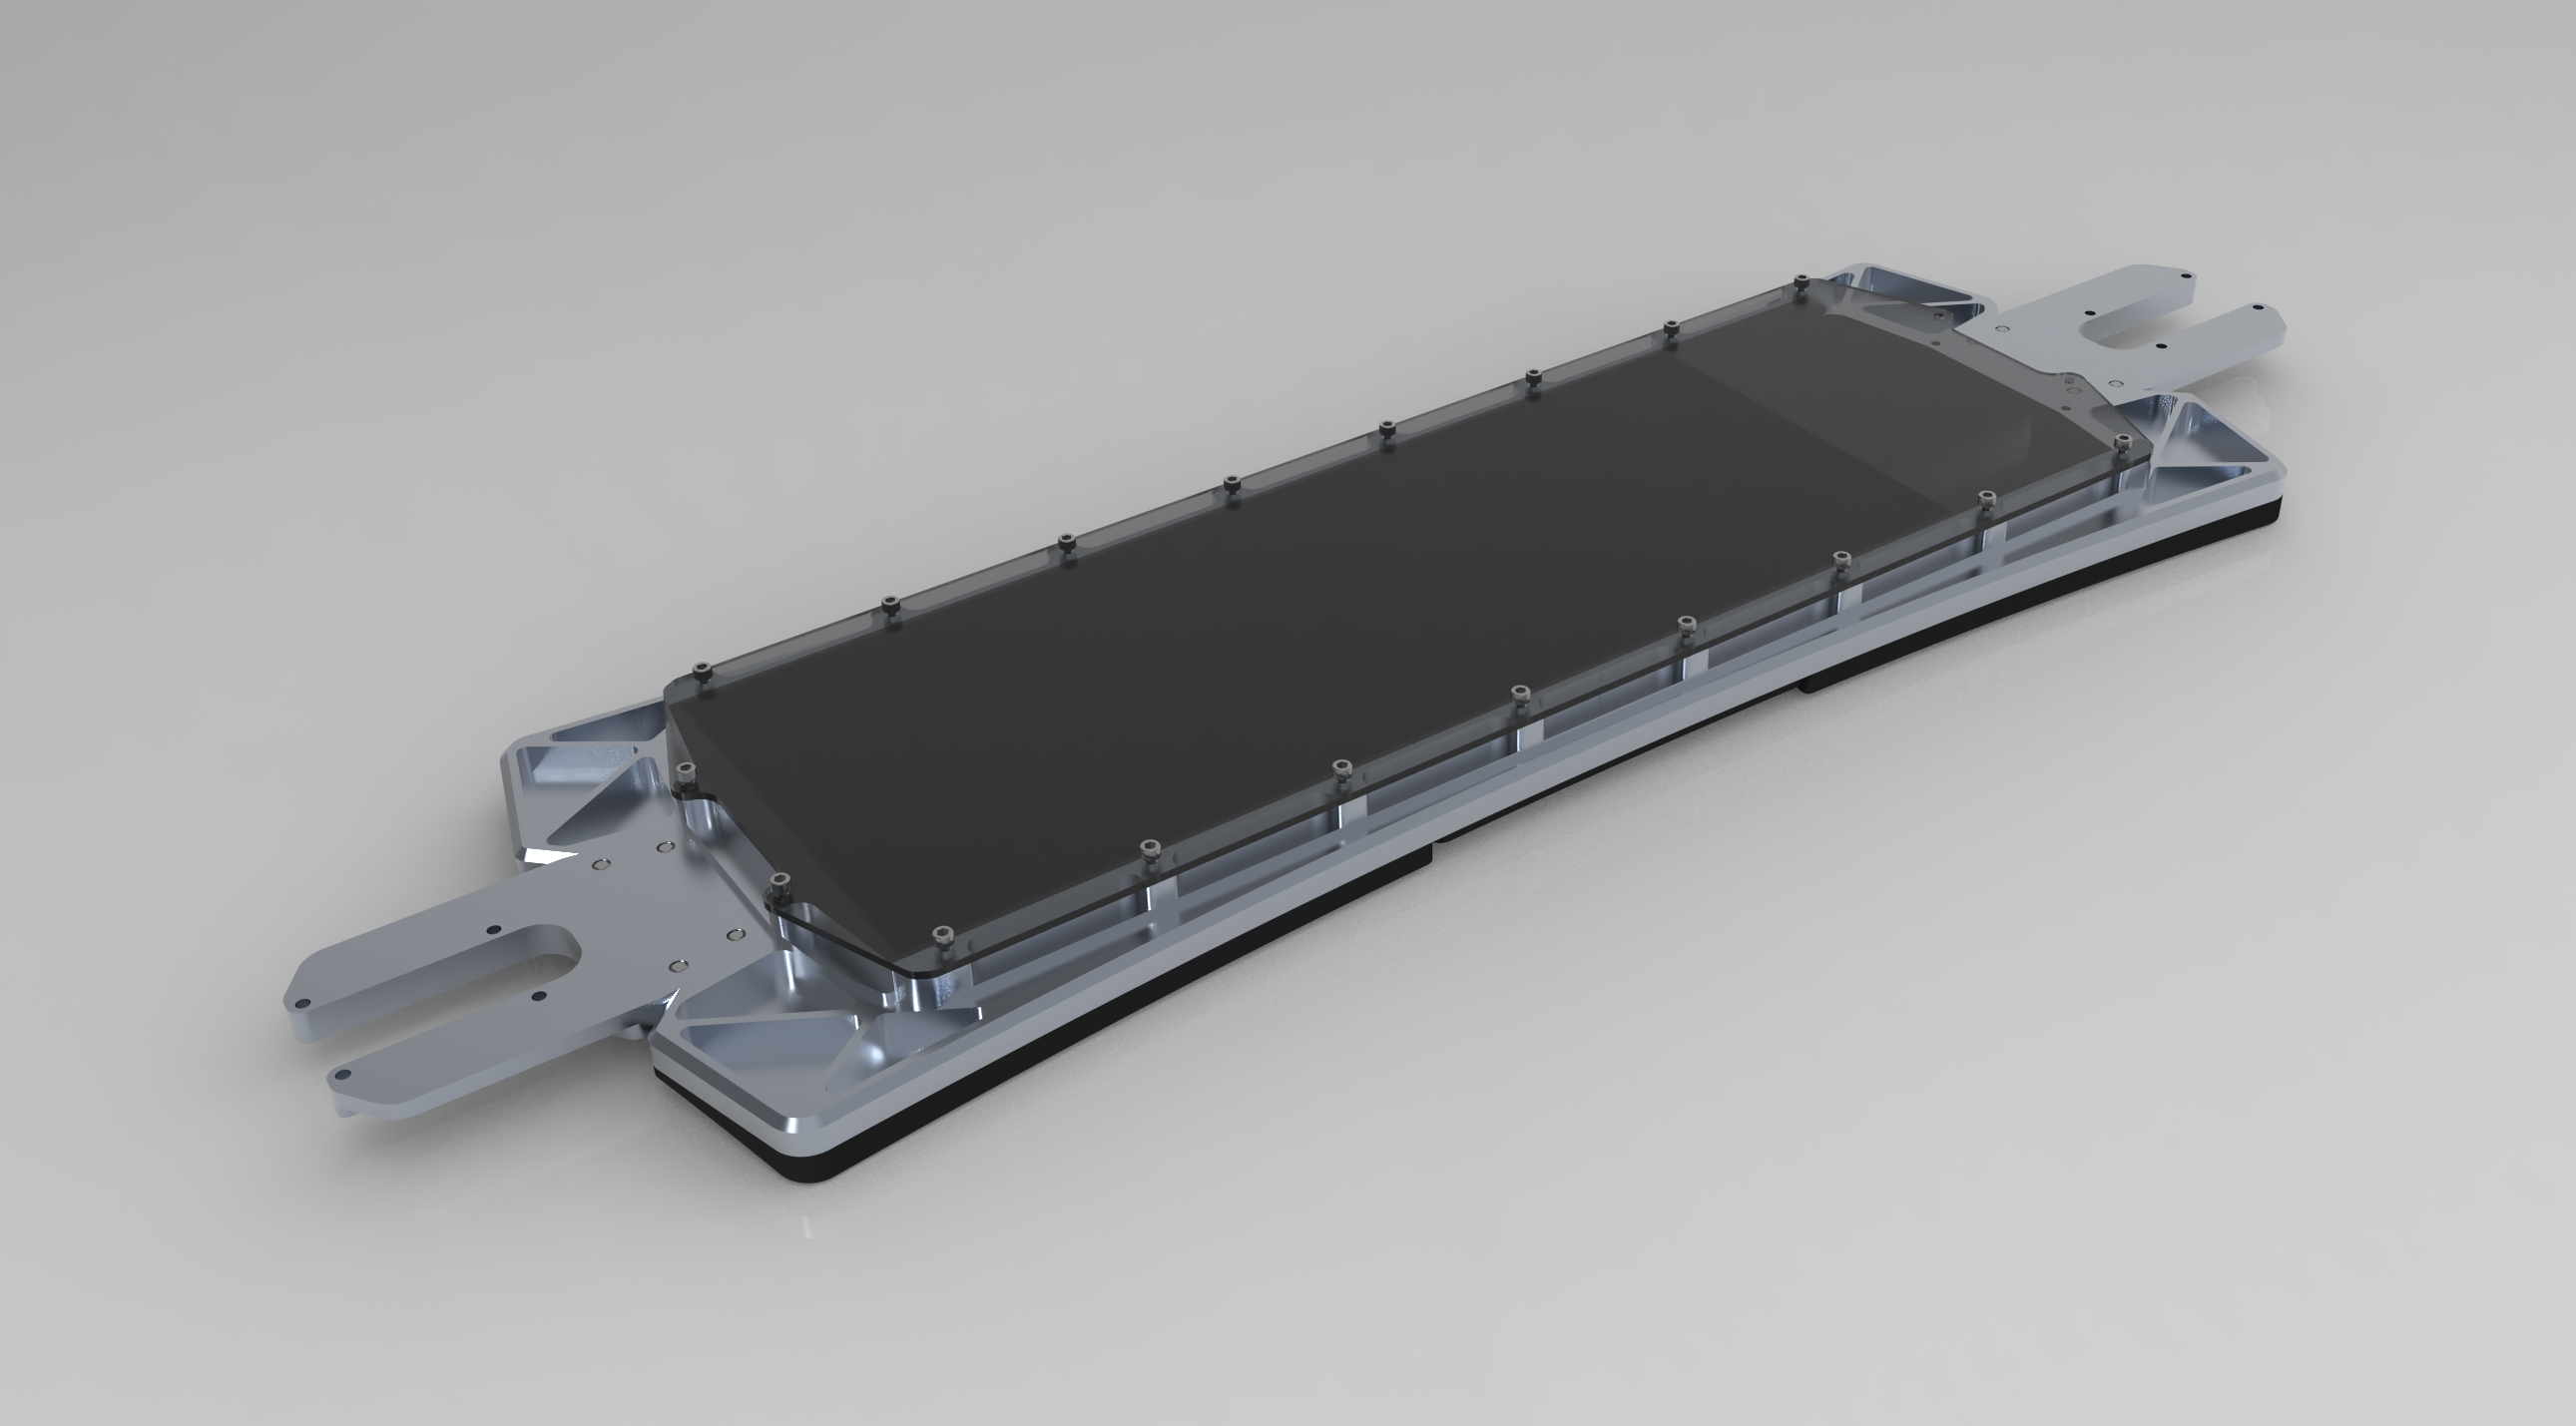
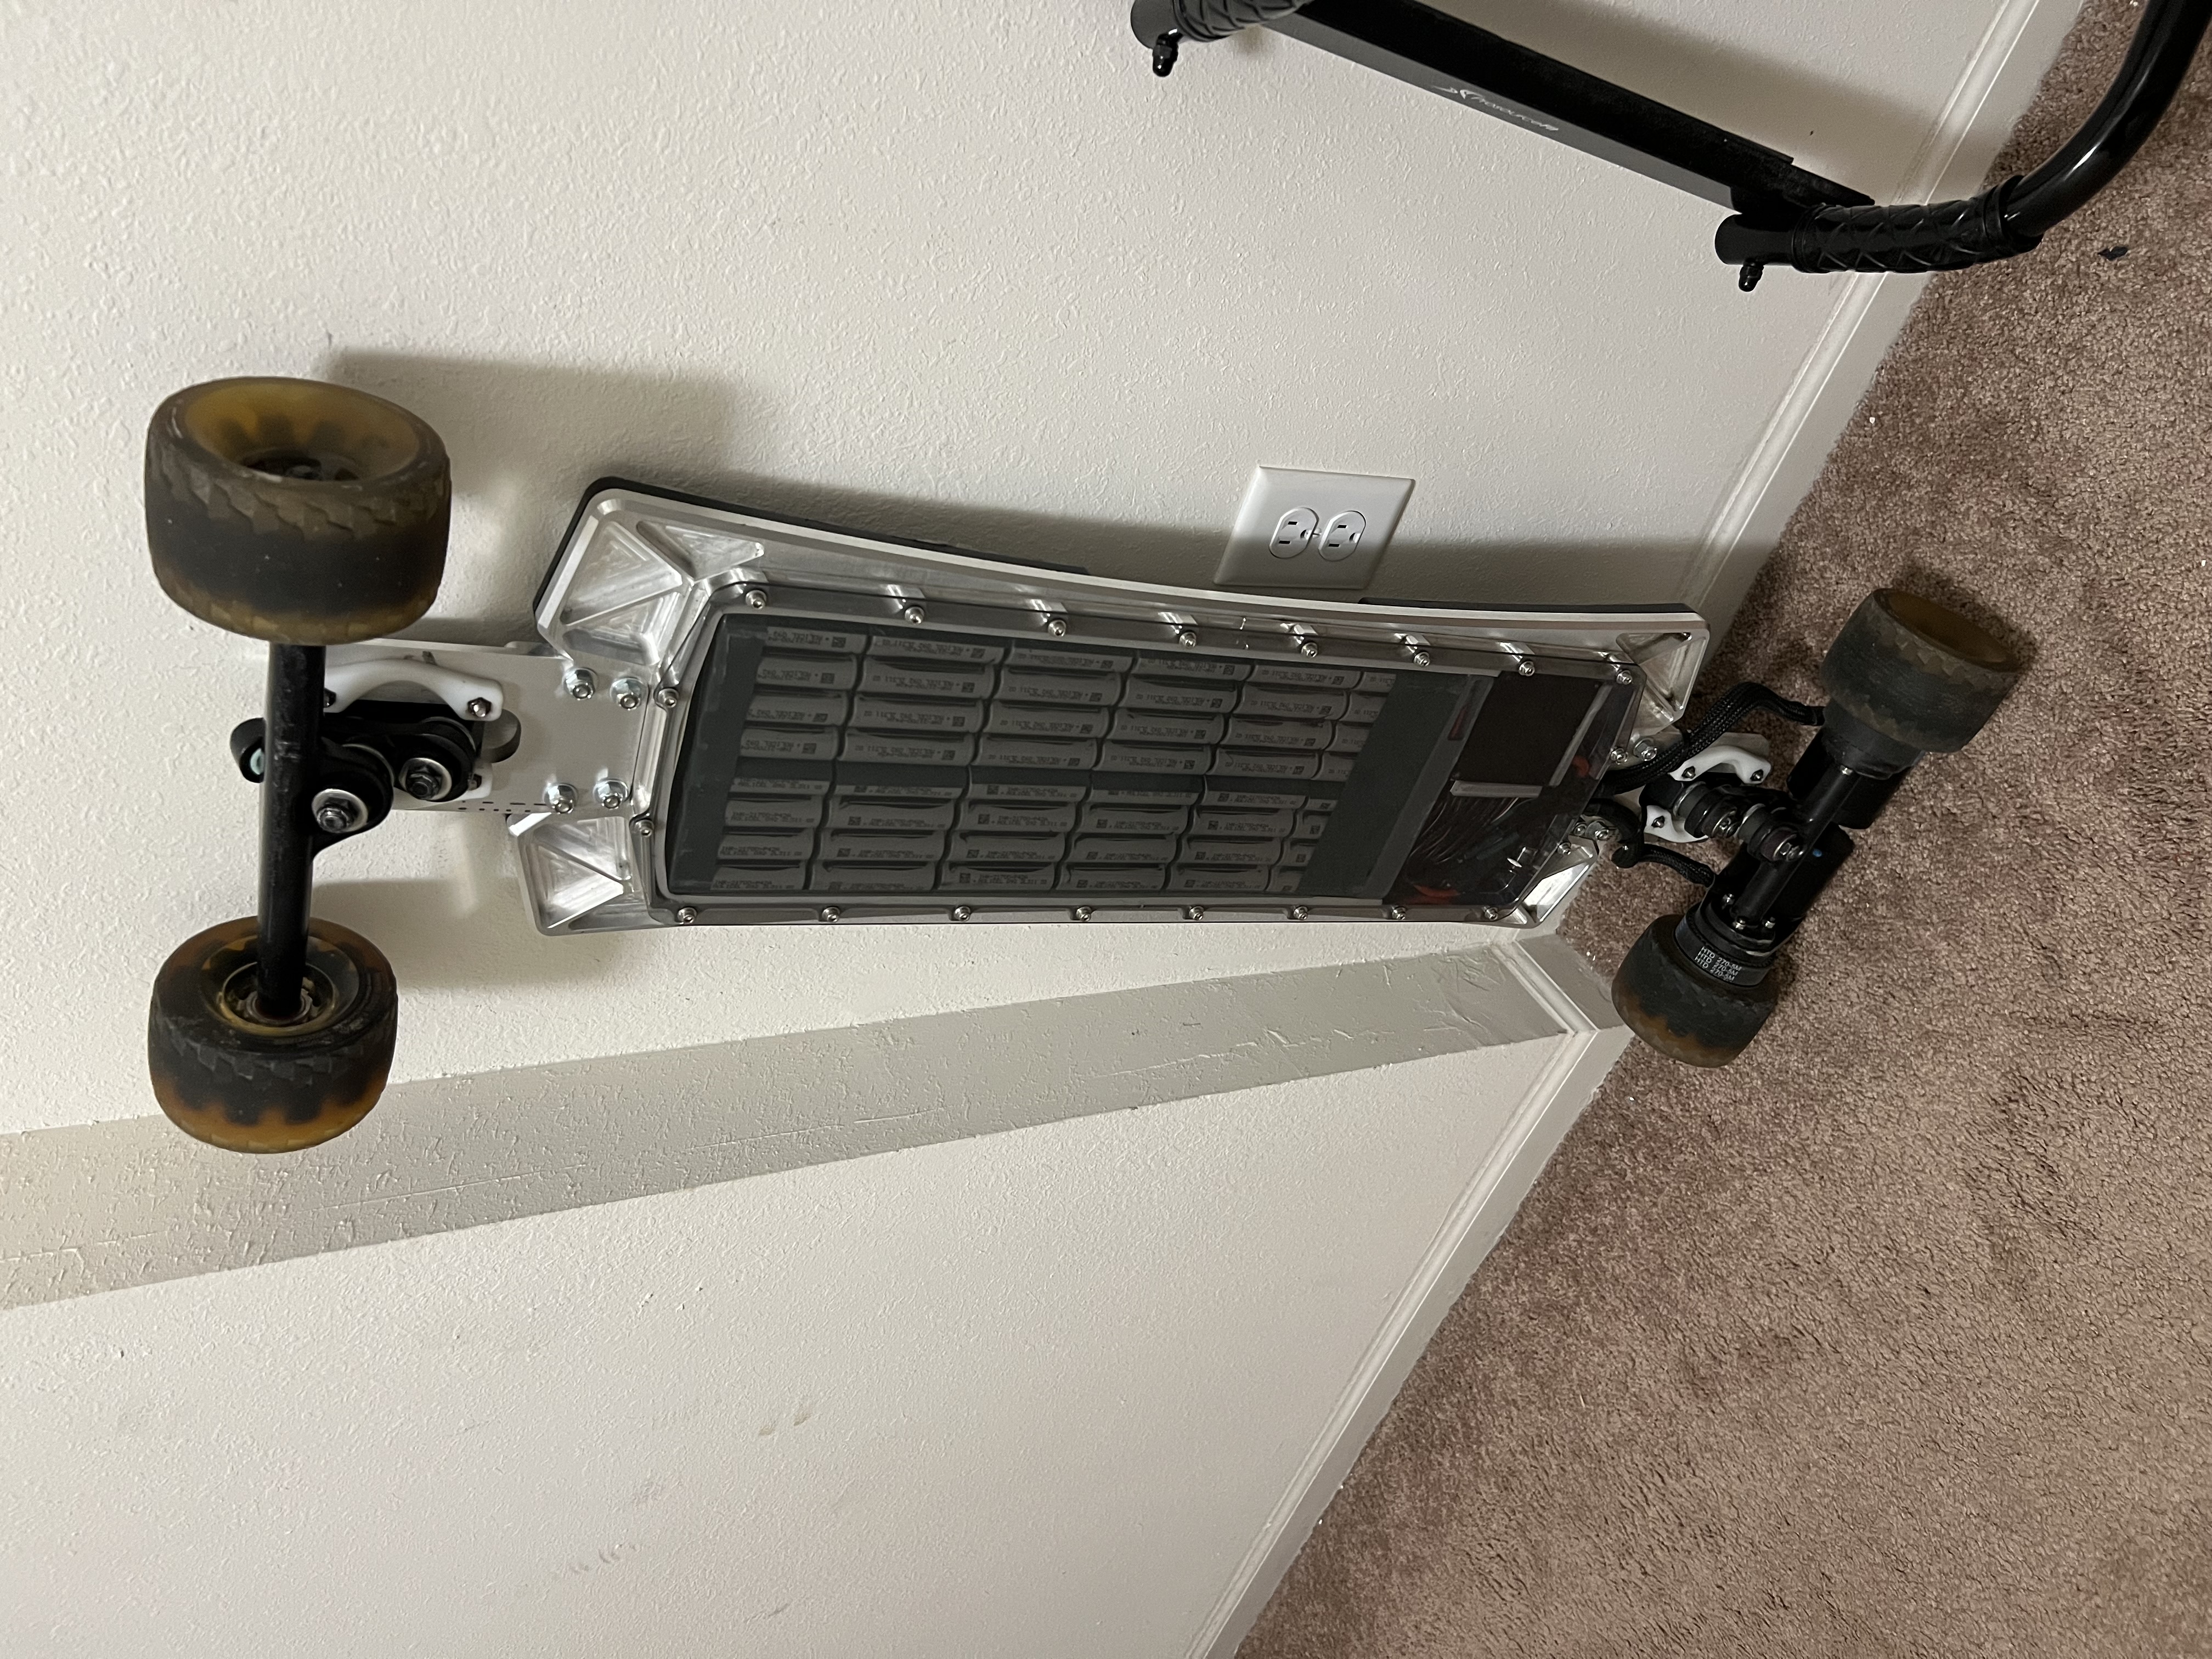
Since aluminum was used for the structural material instead of bamboo and fiberglass, the deck flexes significantly less. This means that I can have a very large battery pack that does not need to be very flexible. I decided to get a battery pack kit from Duck Battery Systems. They have a very compact 12s4p 21700 li-ion battery pack design that I choose to use for this electric longboard. The 12s4p cell configuration would give me a voltage and capacity upgrade from my old 10s3p cell configuration which would increase power and range. I estimated around 20% more top-end torque and 50% more range with the new battery pack compared to the old one. Despite the new battery pack having 18 more cells than the old battery pack, it has almost the same footprint since it does not need extra space between the cells to flex freely. I’m expecting this battery pack to last another 6000 miles or more.
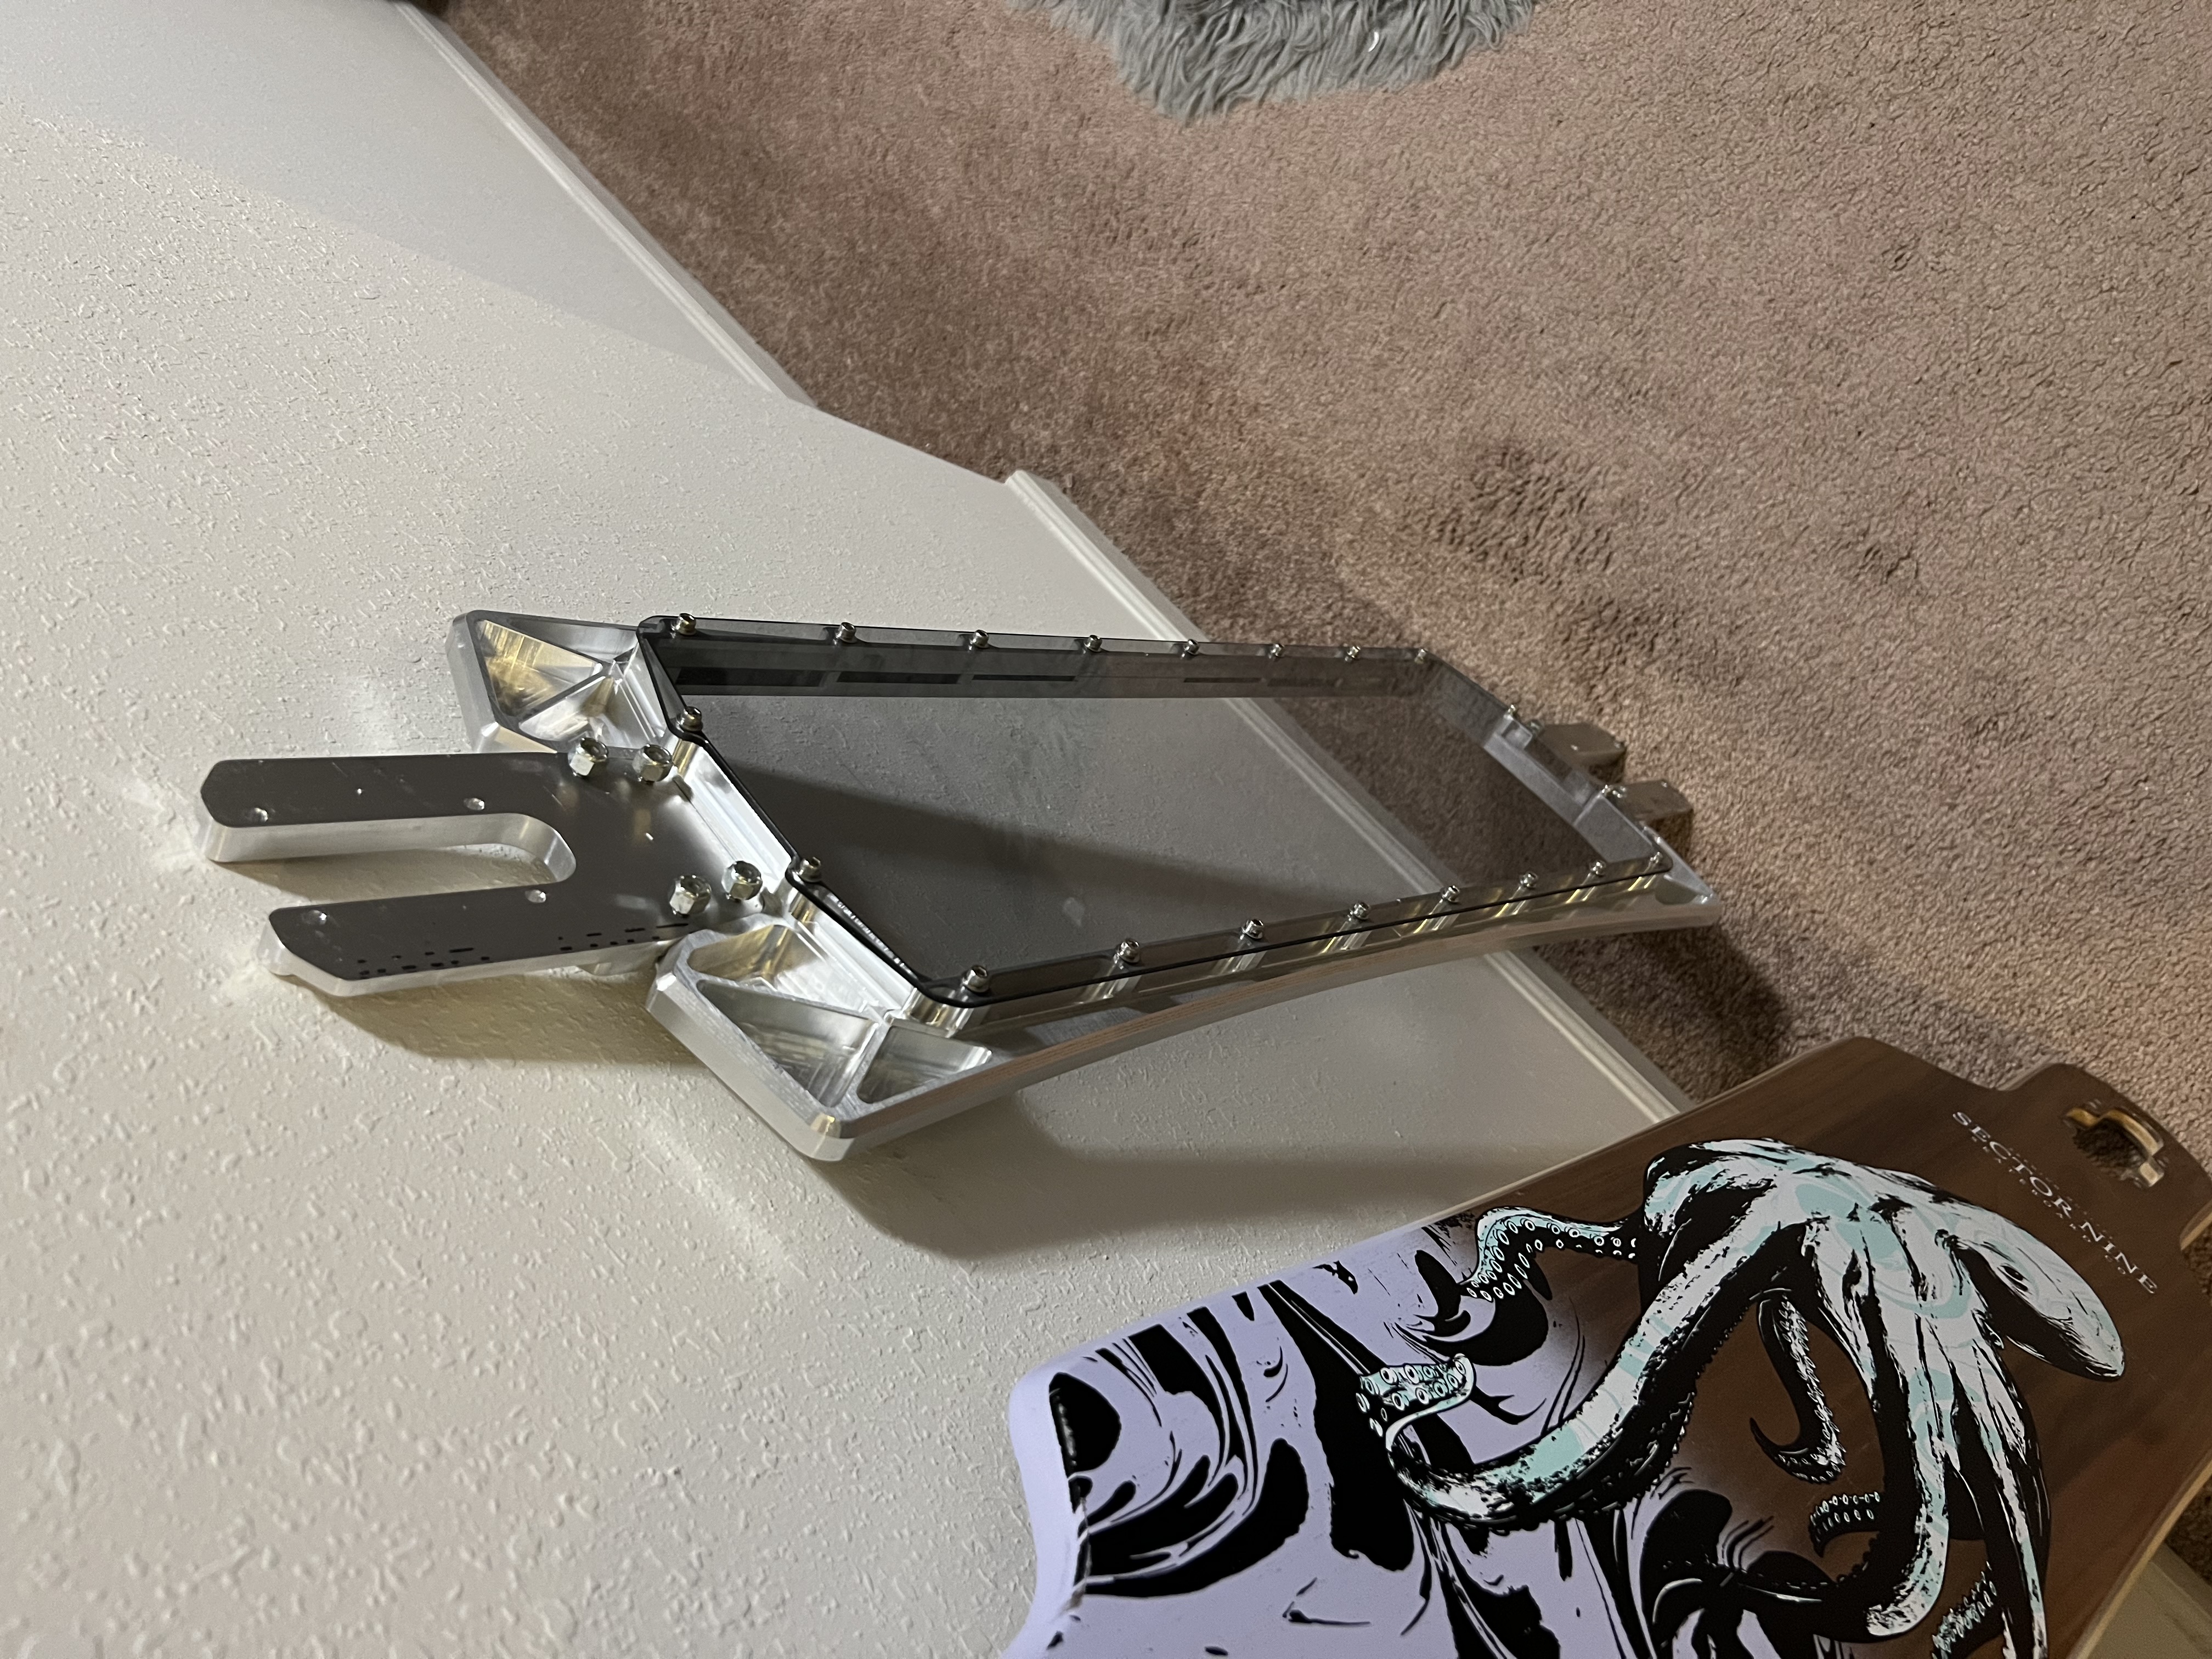
I think the most interesting spec on this electric longboard is the huge battery pack and I wanted to showcase it in the design. I chose to use a piece of clear impact-resistant polycarbonate as the bottom panel to showcase the battery pack. I thought about making the footpads on the top of the longboard clear polycarbonate as well, but it was too expensive. I made the footpads out of black HDPE instead. An advantage of using aluminum is that it is stiffer than wood. This means that to get similar strength to a wooden deck, I can use less aluminum. I designed the aluminum structure to go on the sides of the battery pack instead of above or below it. Only the polycarbonate panel underneath and HDPE footpads above the battery pack add to the thickness of the longboard deck. The overall thickness of the longboard is just under 1.5 inches, which is about half of the thickness of my previous electric longboard. Decreasing the thickness of an electric longboard not only makes it look much sleeker, it directly increases ground clearance under the board. My previous electric longboard used to high-center on speed bumps all the time. You can actually see some of the speed-bump marks on the first image of the electric longboard V2 post from my very first time riding it. The extra 1.5 inches of ground clearance should drastically reduce the chance of high-centering on this new electric longboard. Impressively, if you don’t count the time it took for me to set up and machine everything, the total cost of all the plastic and aluminum for this new electric longboard was less than the cost of the bamboo and fiberglass deck.
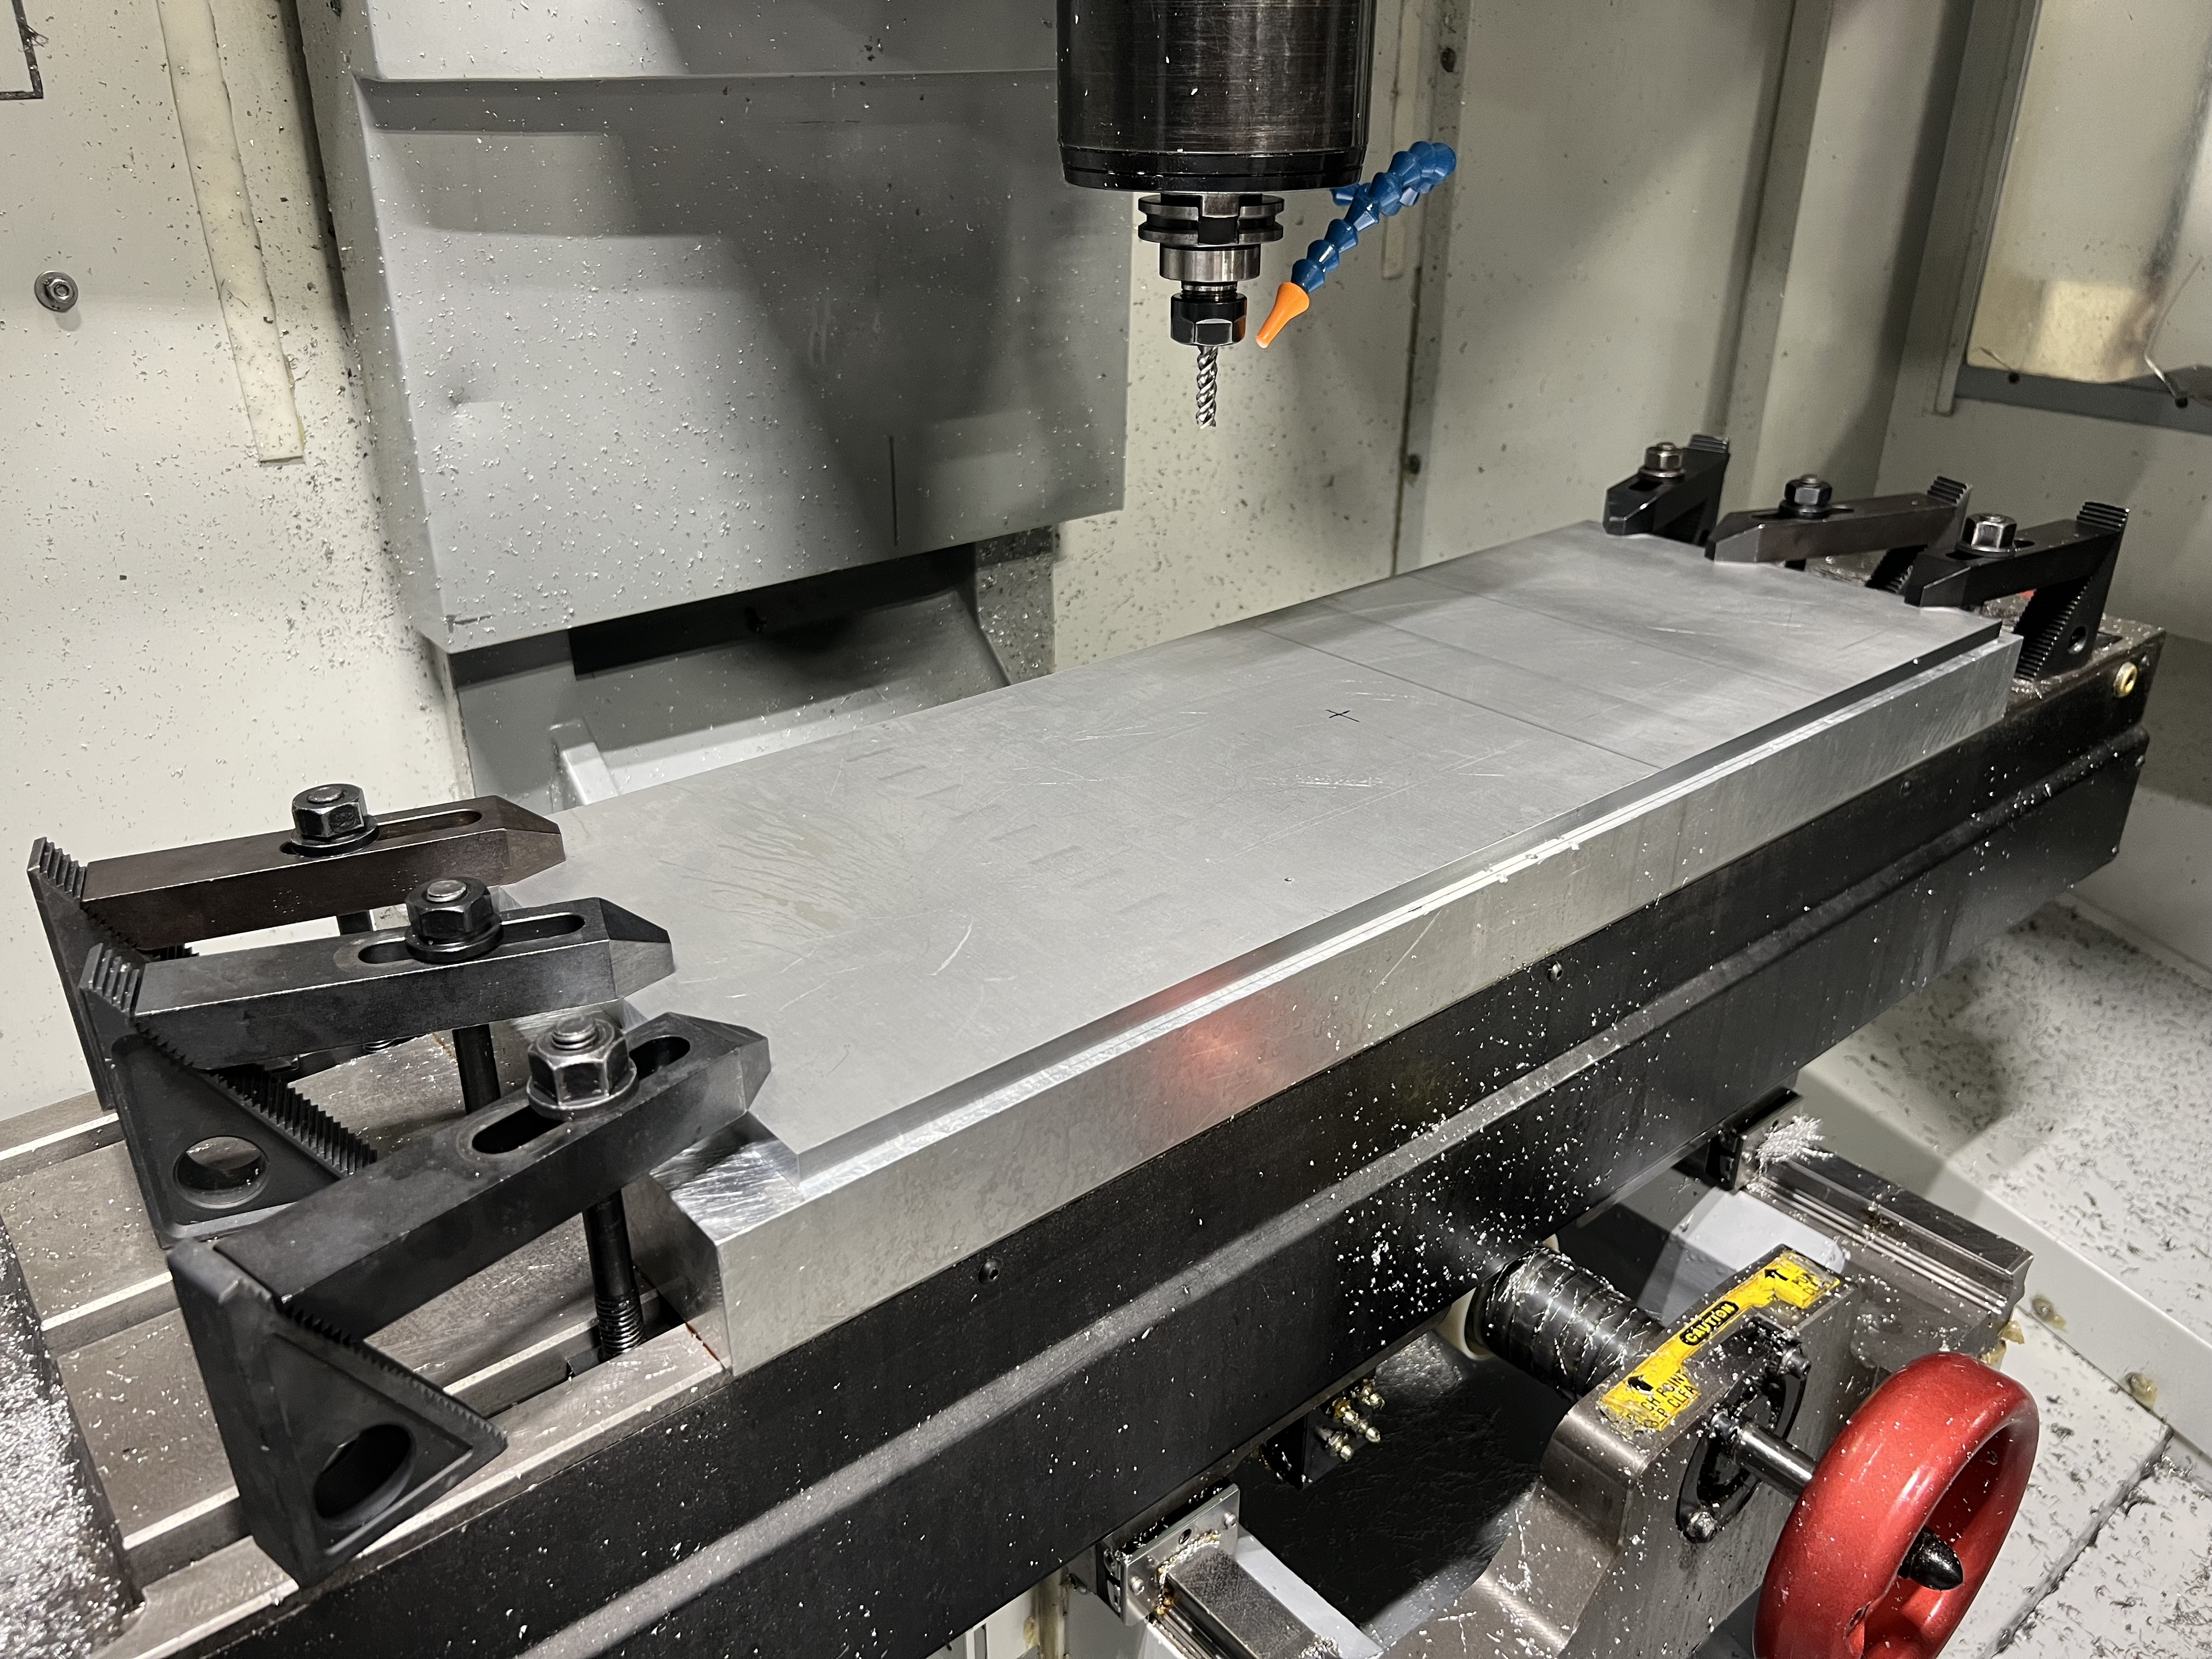
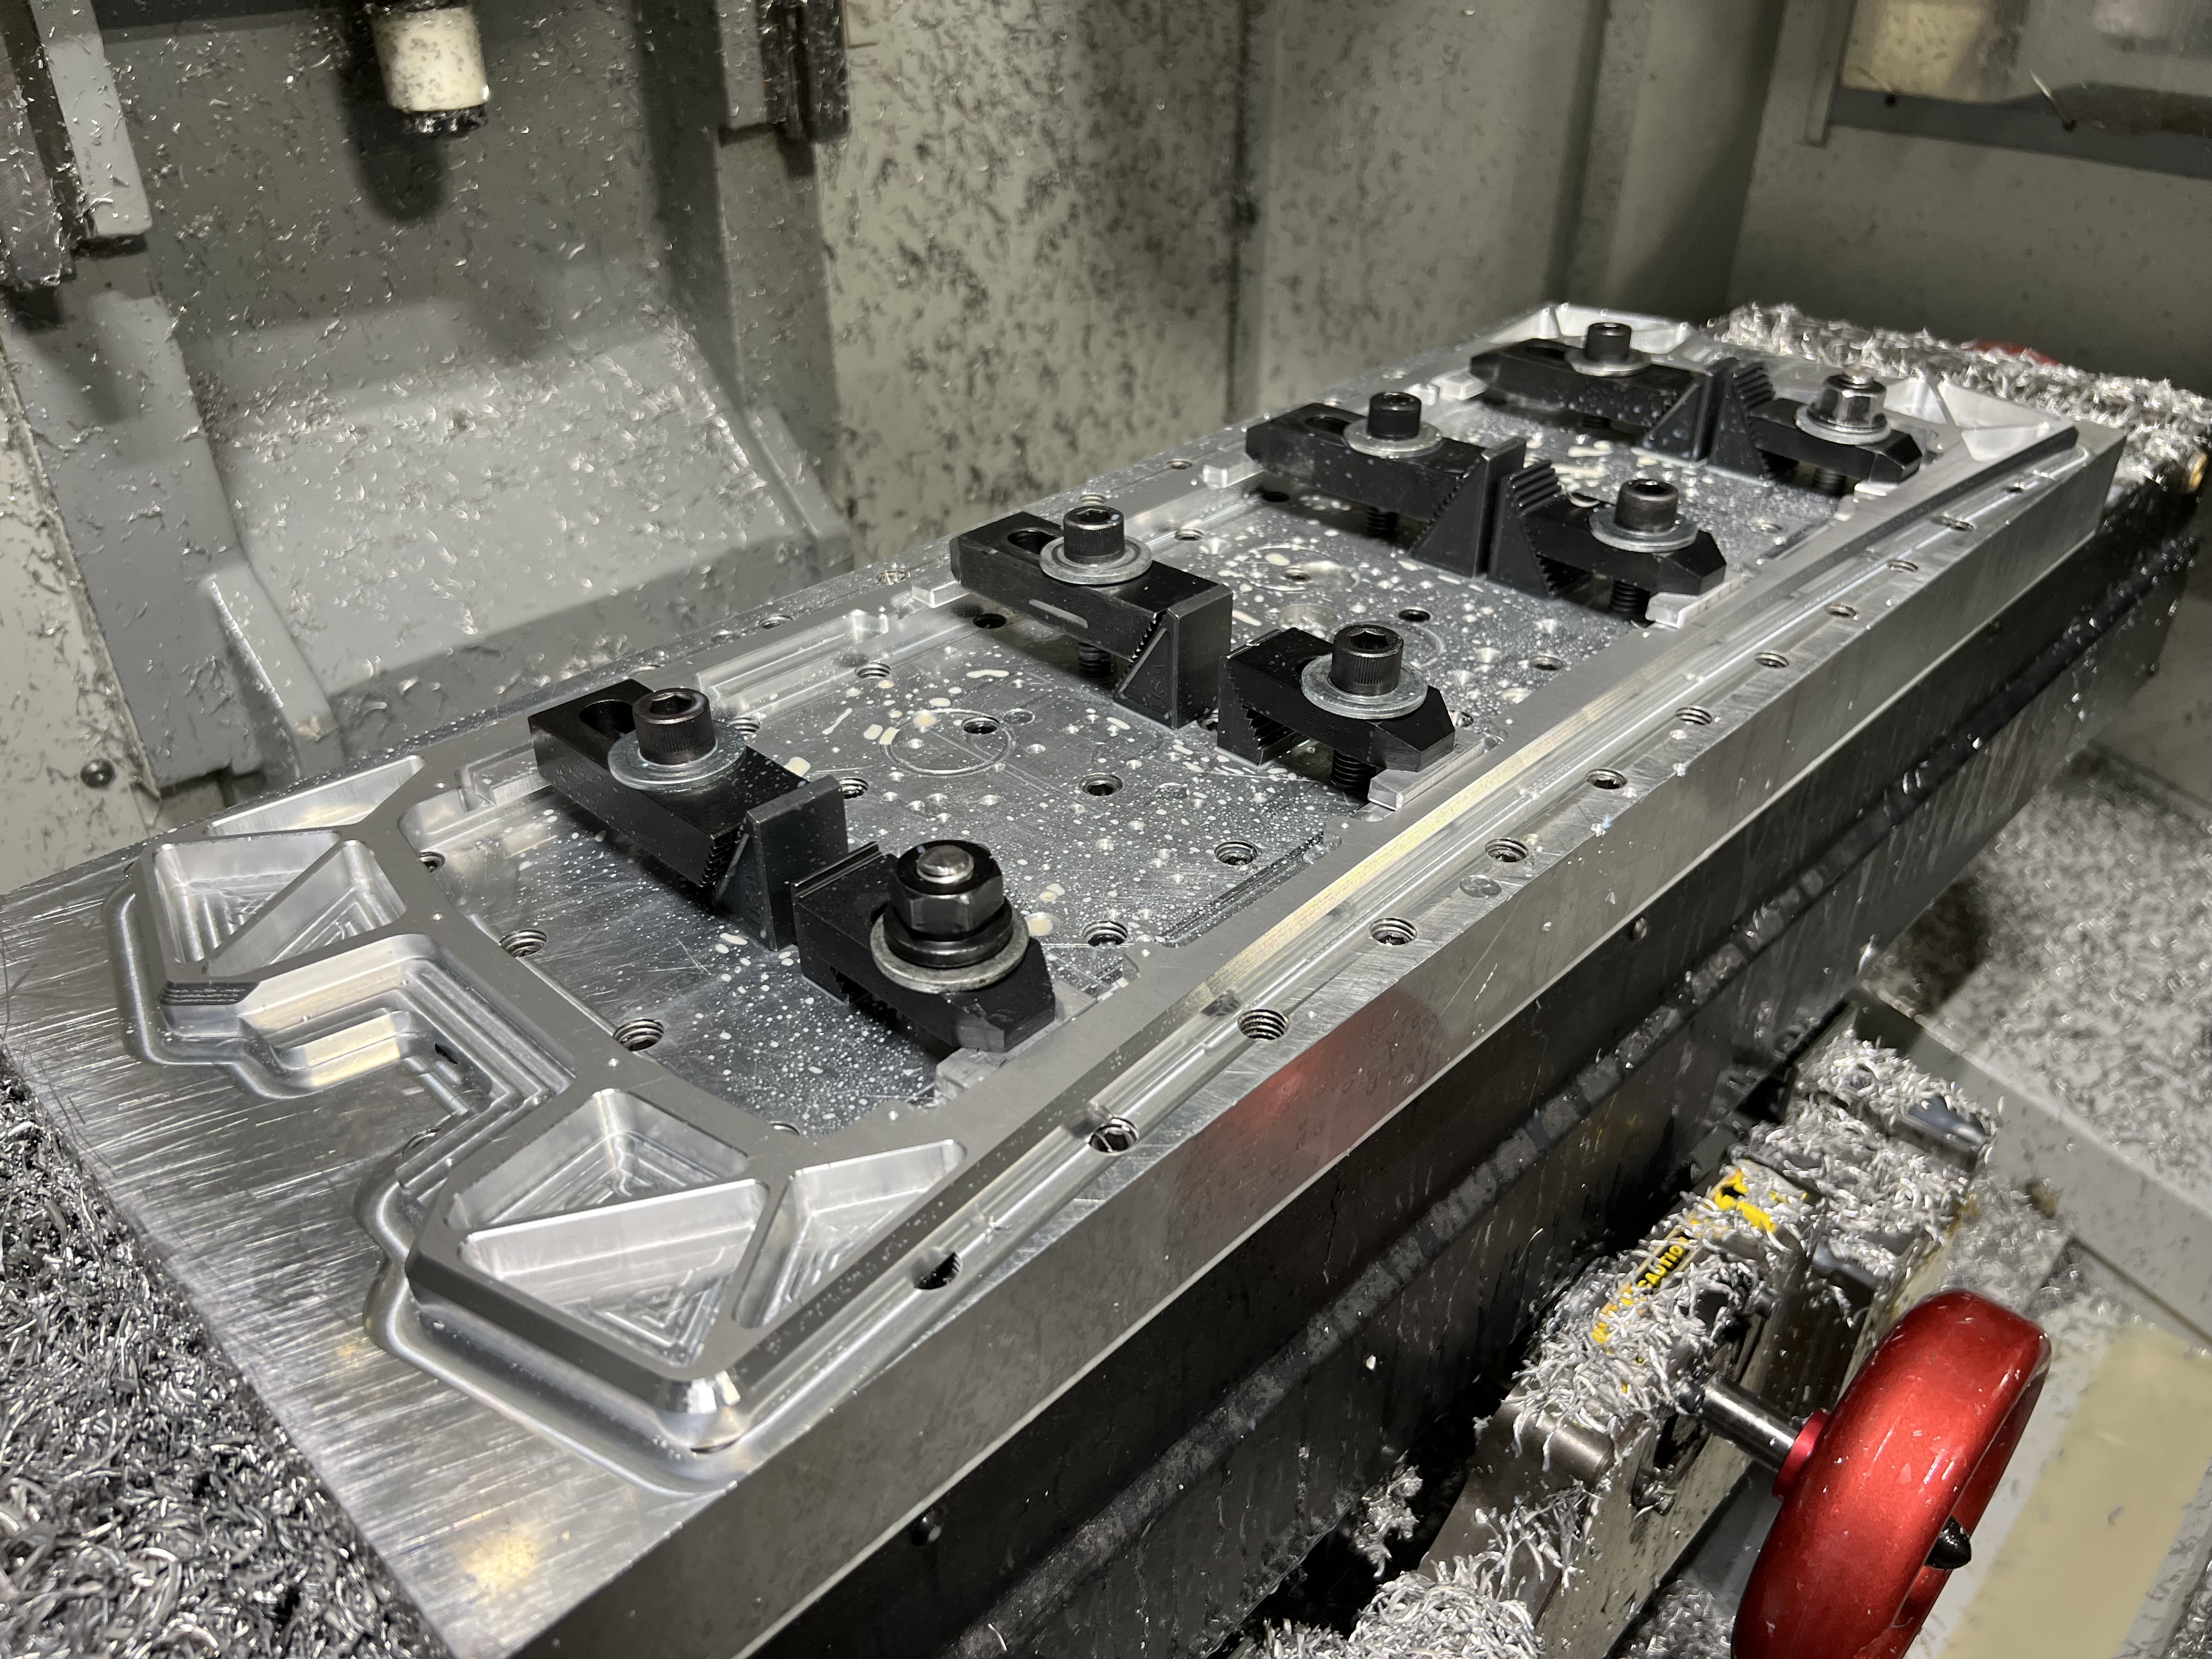
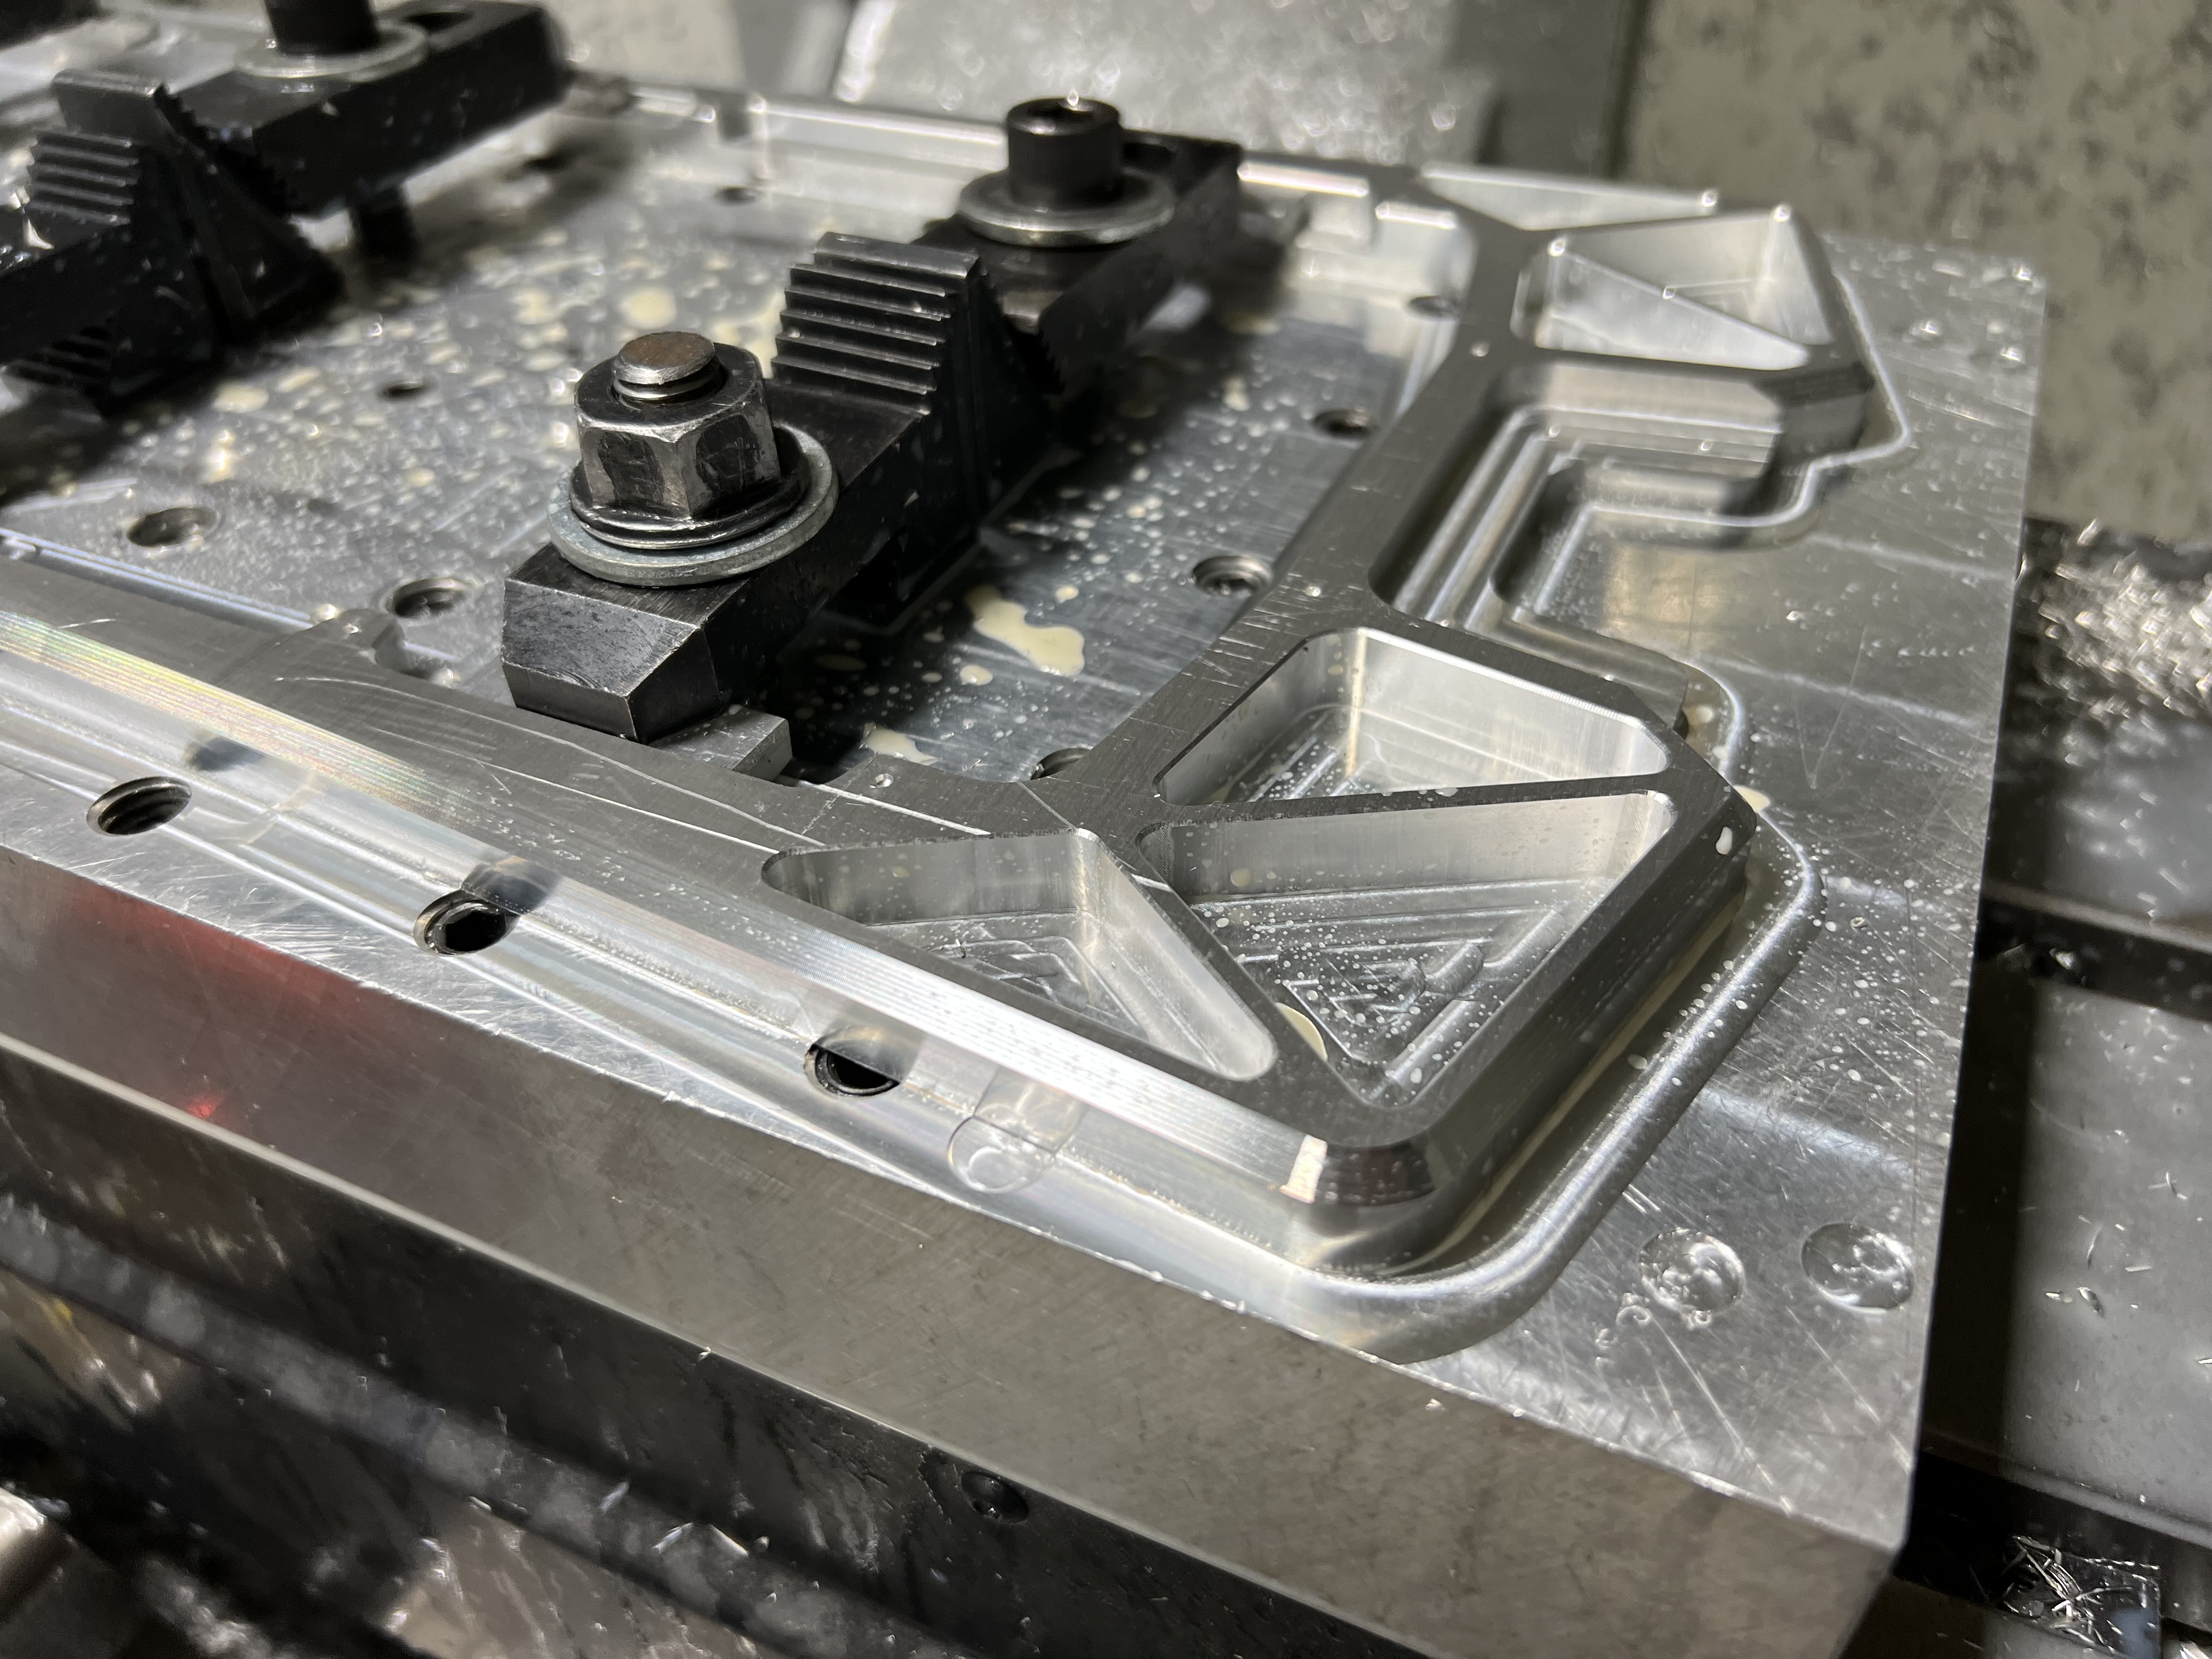
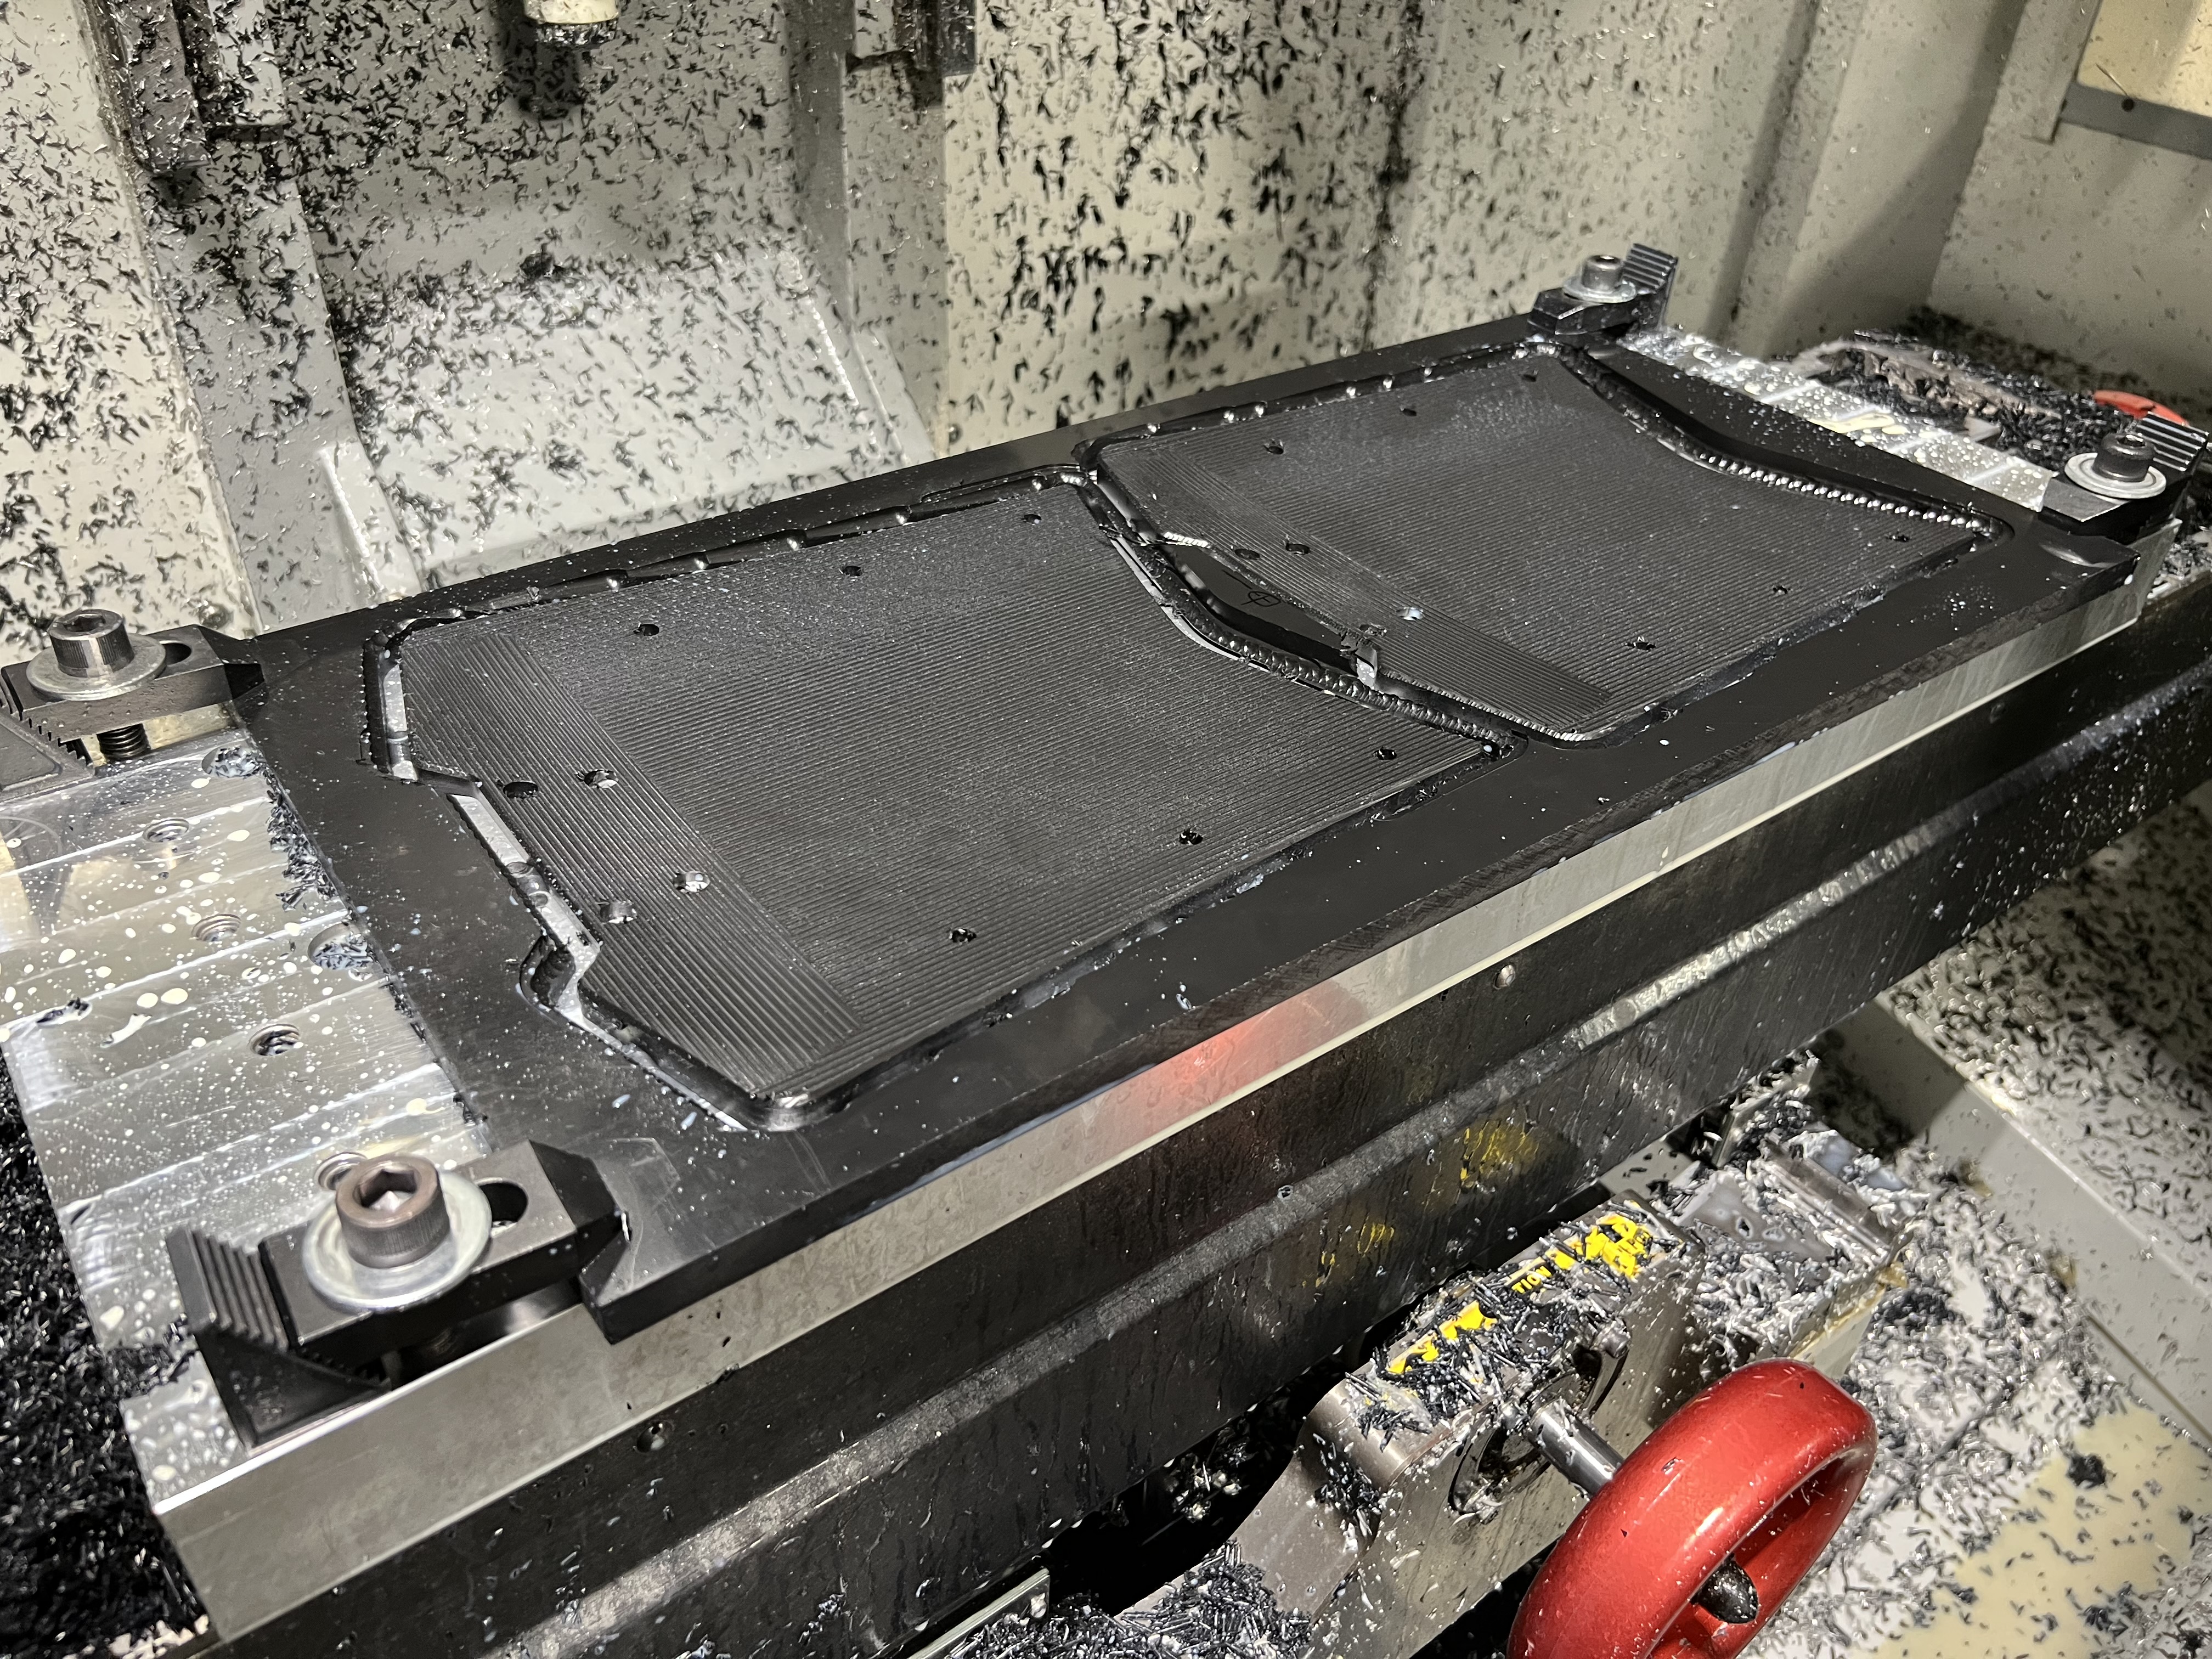
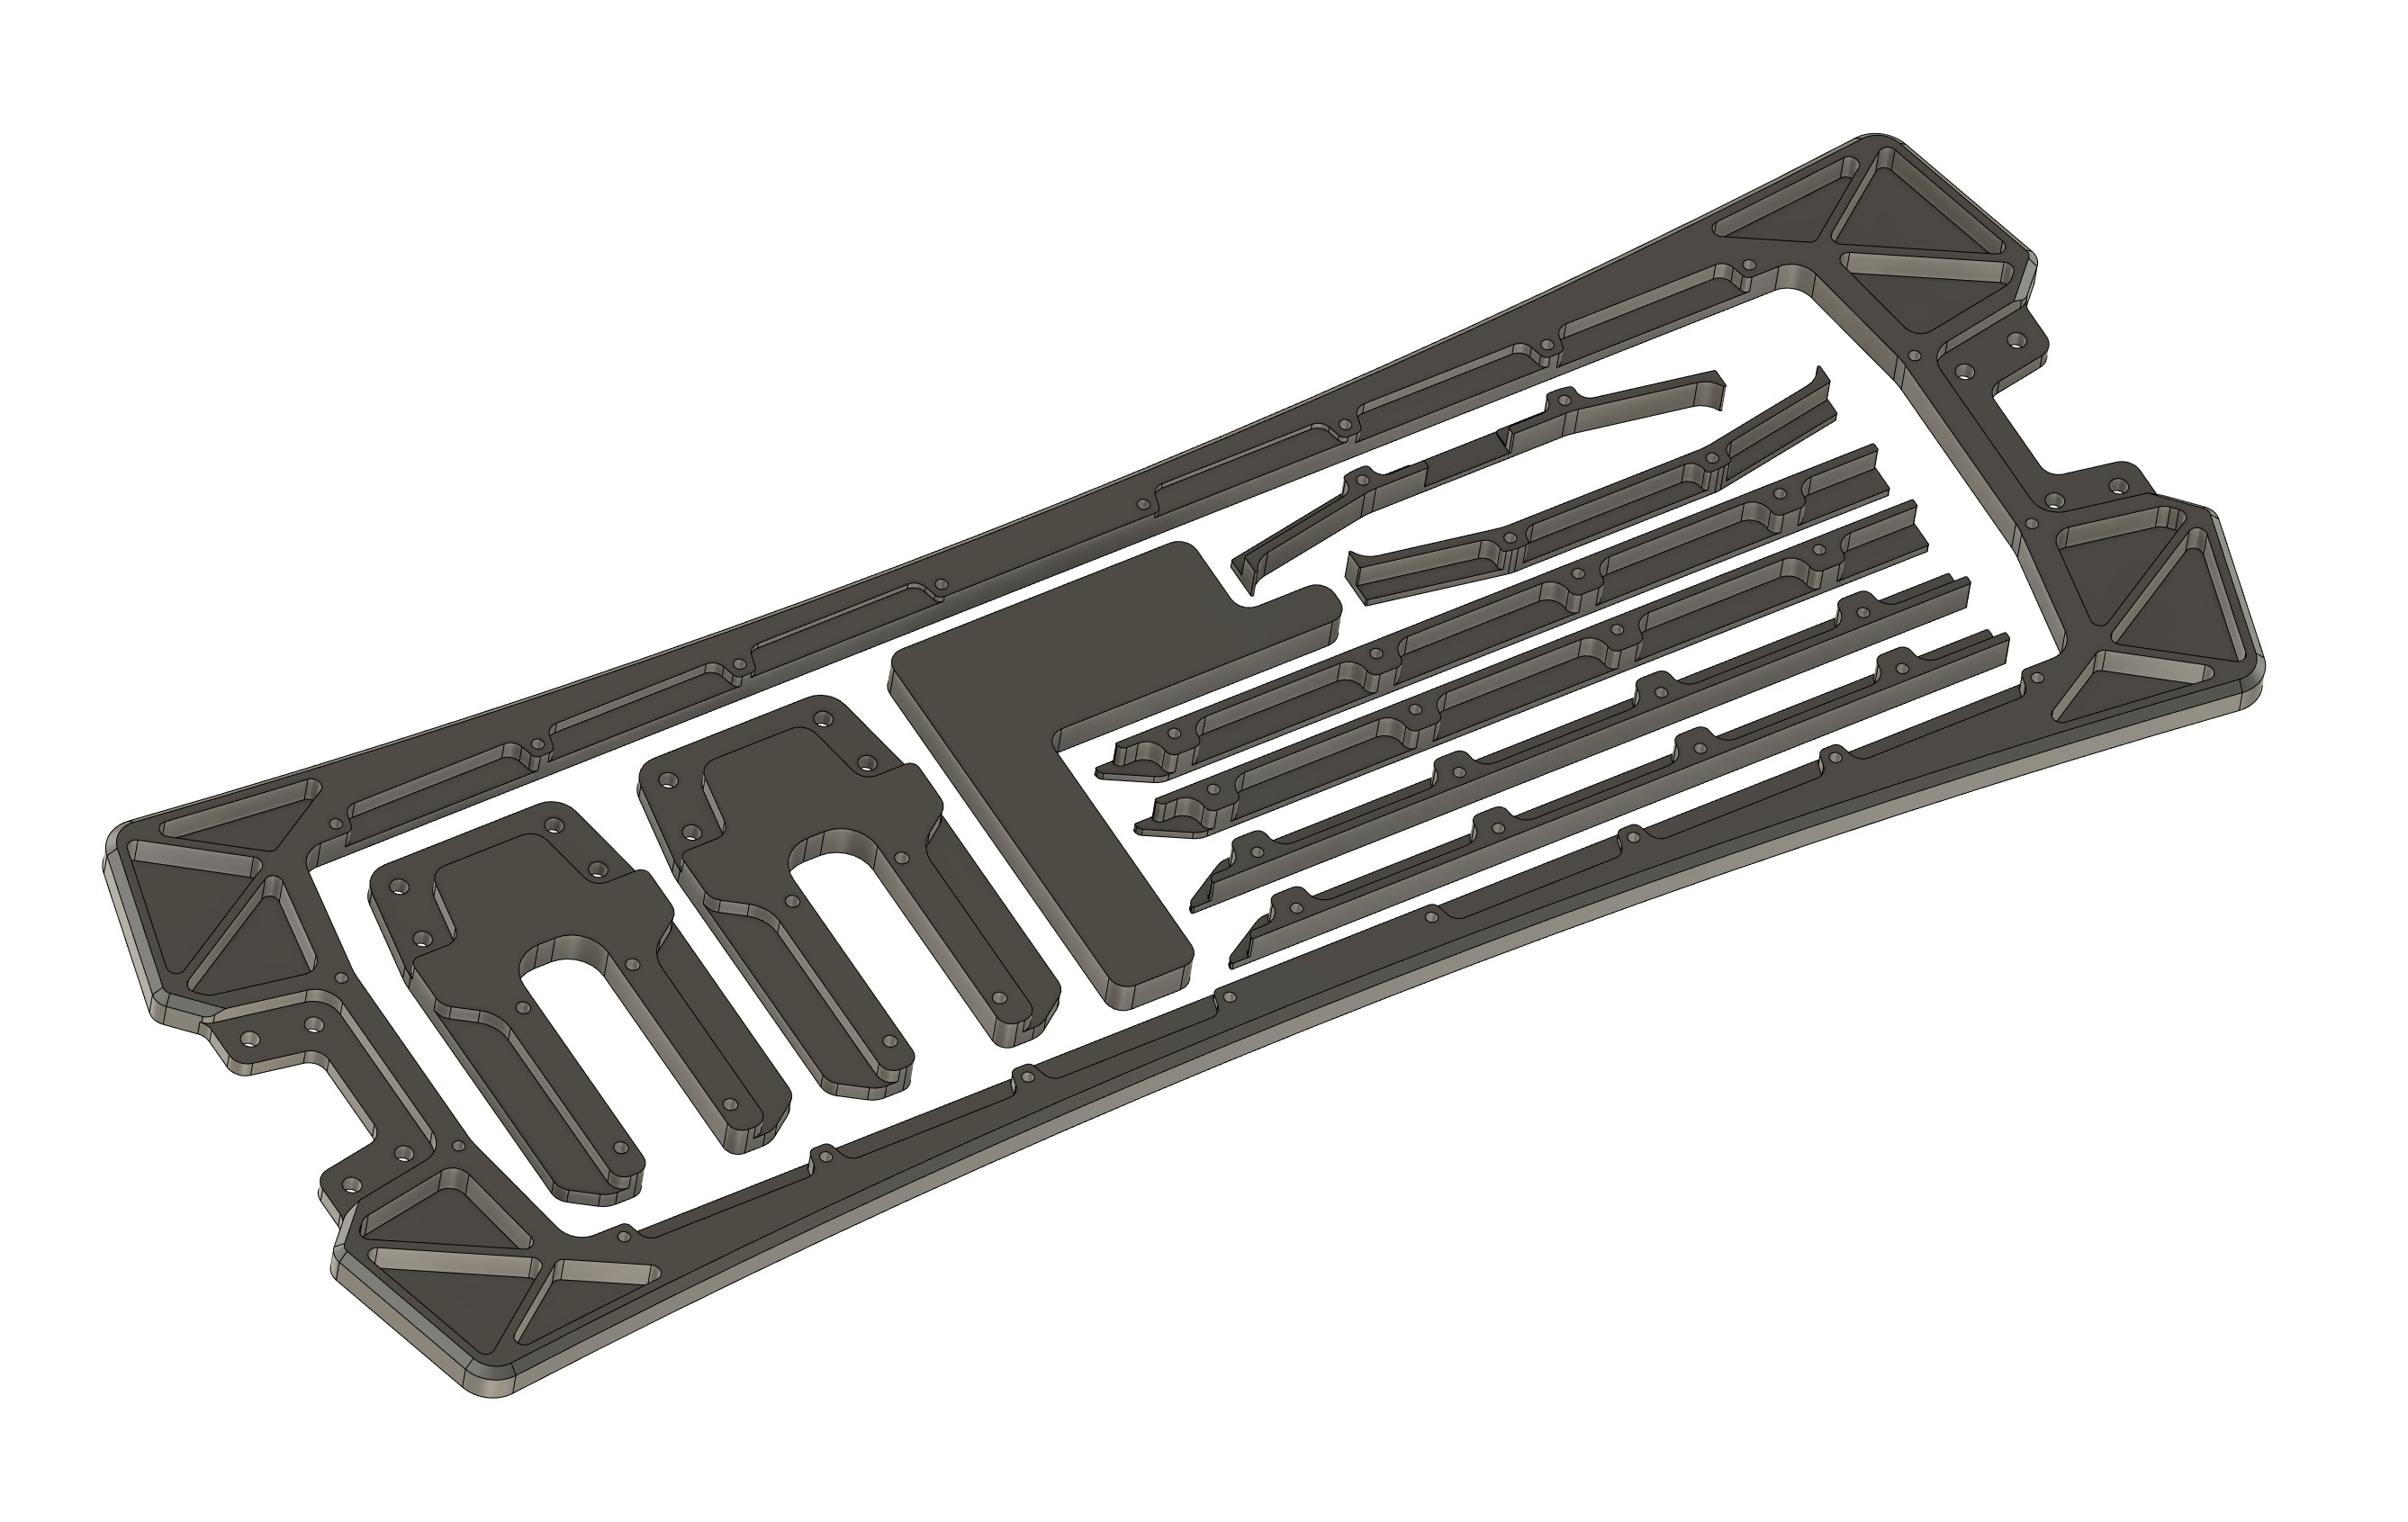
By far, the most interesting part of this project was manufacturing the deck parts. Everything on this longboard was machined on a Haas TM-1 CNC mill over the course of a couple hours split across several days. Manufacturing the deck was split into three parts, the large main structural aluminum layer, the smaller additional aluminum parts, and the plastic parts. The additional aluminum parts included the battery spacer and truck mount parts. All aluminum parts were machined out of a single 28”x10”x0.5” plate of 6061 aluminum from Midwest Steel and Aluminum Supply. This piece of aluminum fit perfectly into the 30” by 12” travel on the Haas TM-1 with some room around for the end mill. Nearly all of the roughing and finishing was done with a ⅜” high-helix carbide end mill. Some machining was done with a smaller diameter ¼” 2-flute carbide end mill to reach some tighter internal features. Carbide ball and chamfer mills were used to create some chamfers. All of the toolpaths and g-code were created in the Fusion 360 CAM package.
The first thing to be machined are the smaller additional aluminum parts. These additional parts are the two front and rear truck mounts and six battery spacer pieces. Since all eight of these parts have different geometries, I did not want to make different work holding fixtures for all of these parts. I was able to lay all of these additional aluminum parts in the space that would otherwise be all milled out to make space for the battery and electronics. All of these additional aluminum parts would be machined and finished together in a single milling operation. All of these parts were tapped off of the CNC mill.
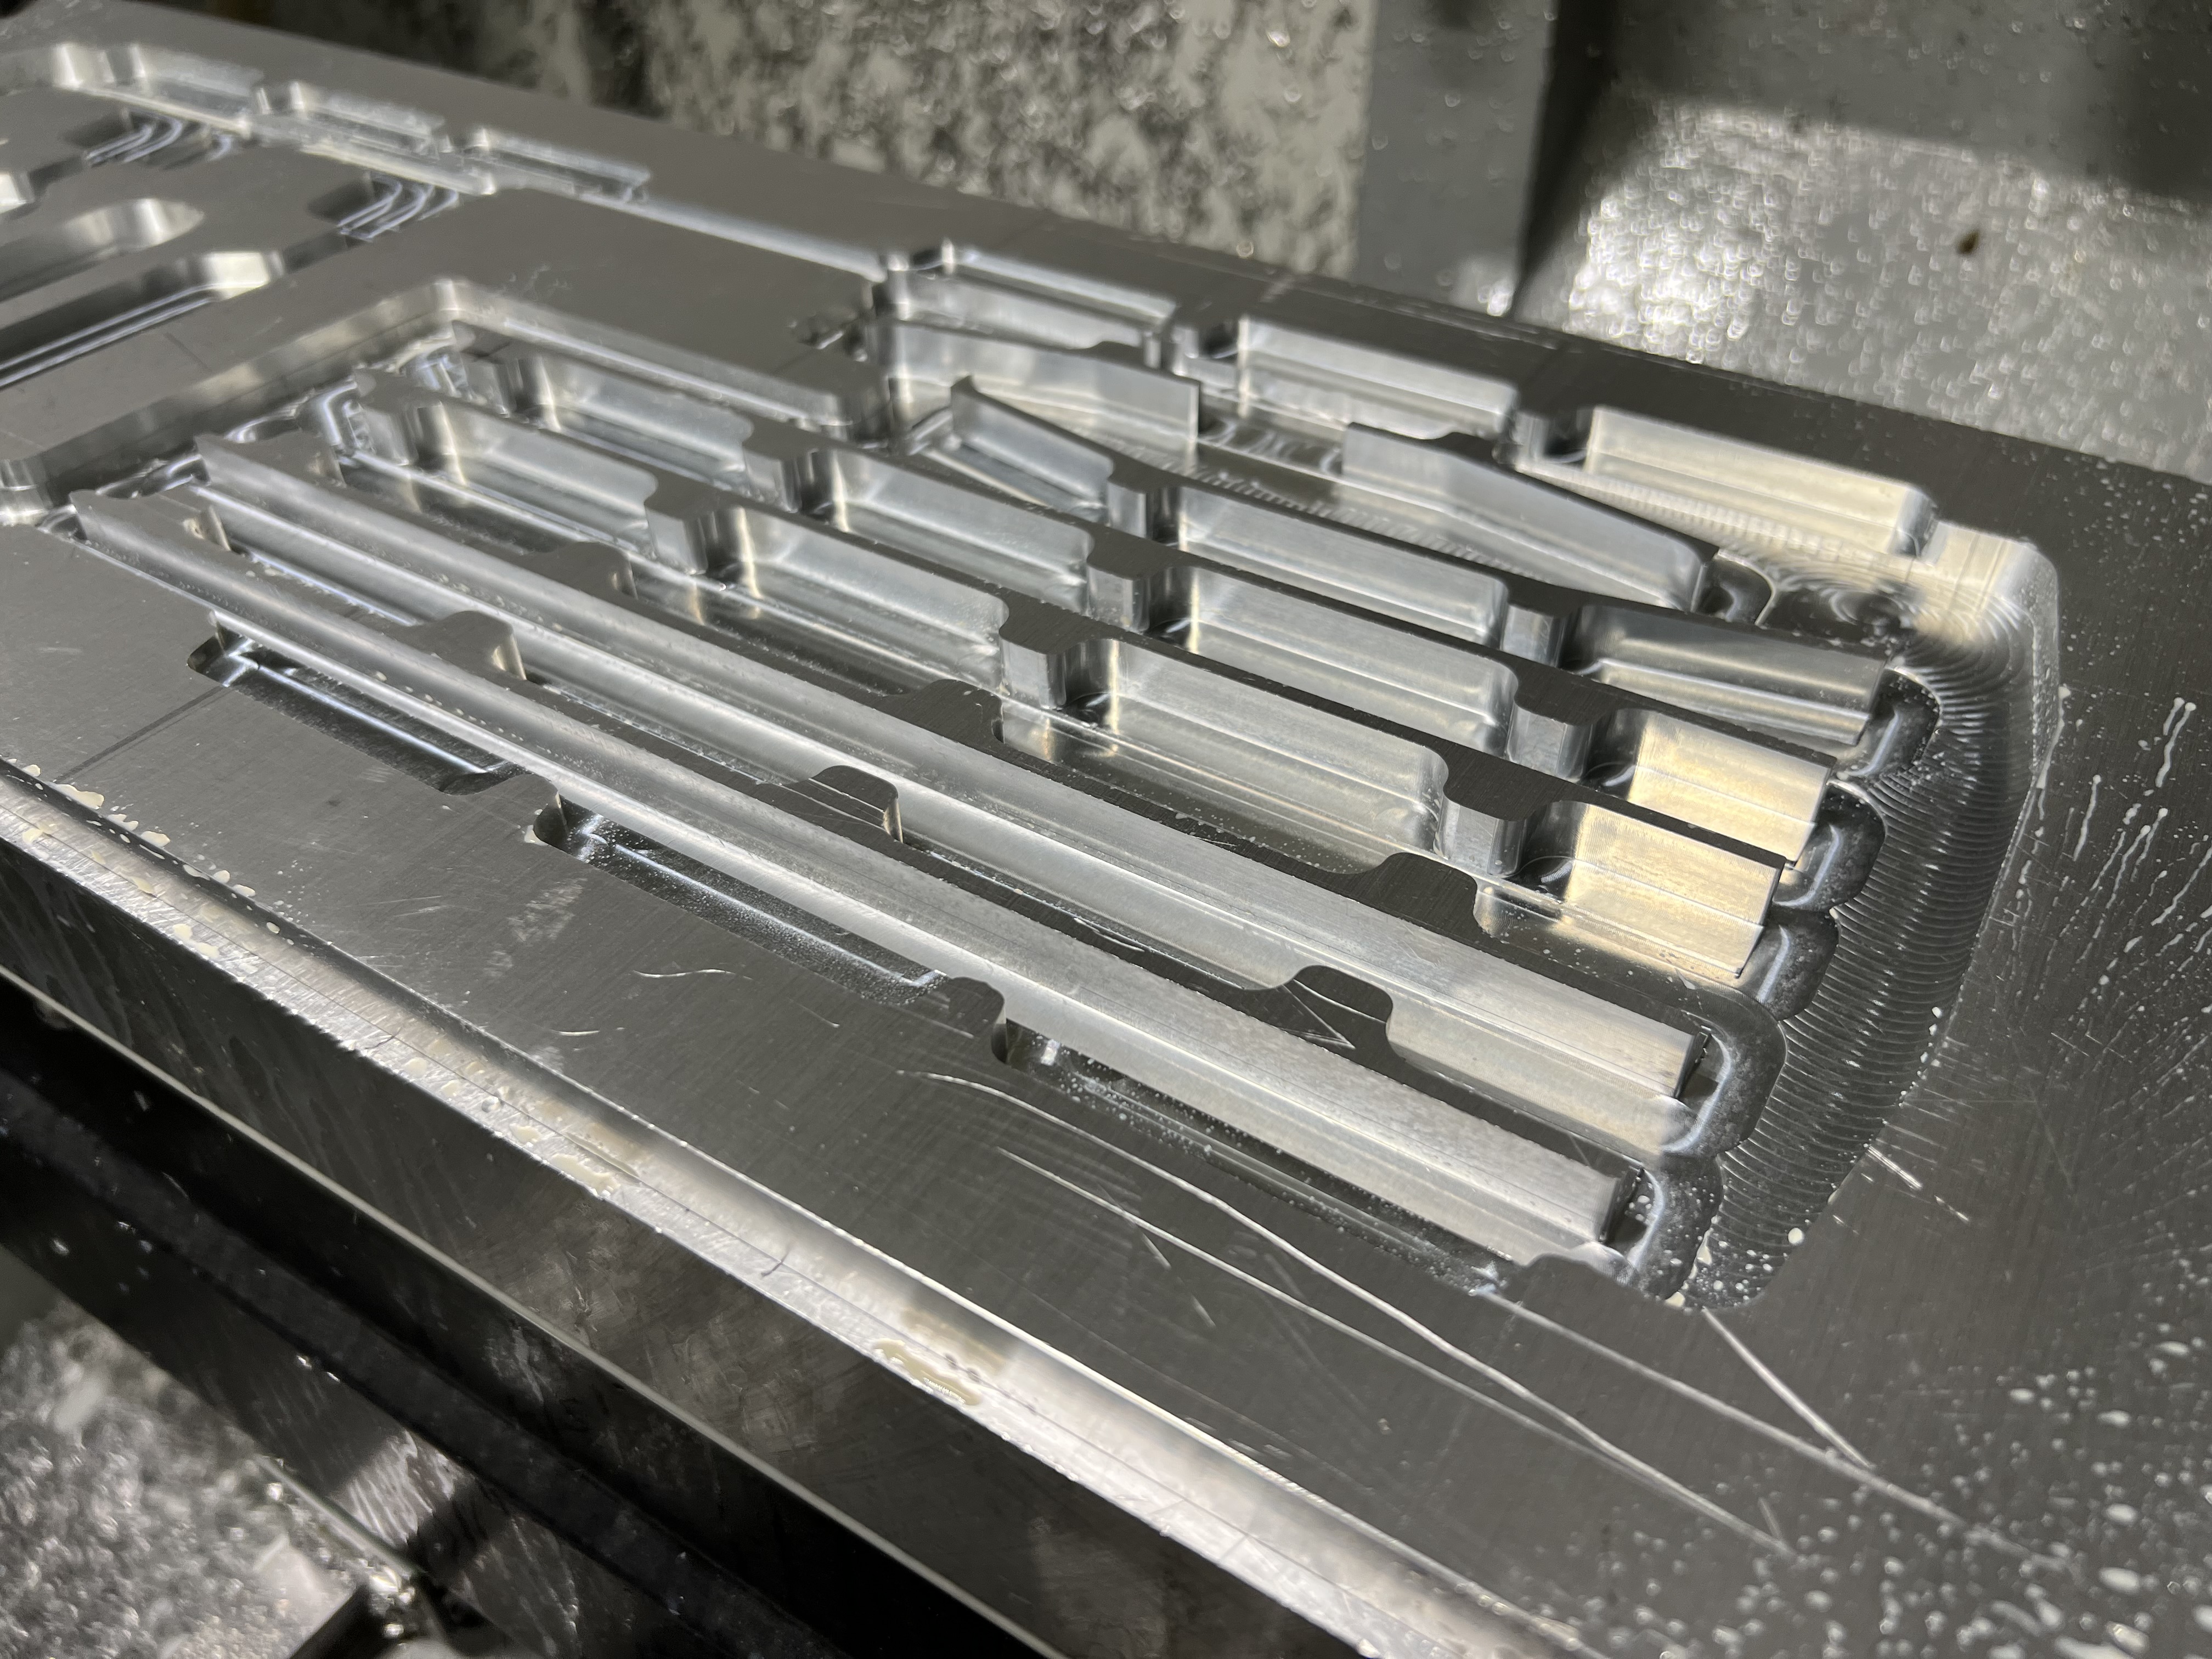
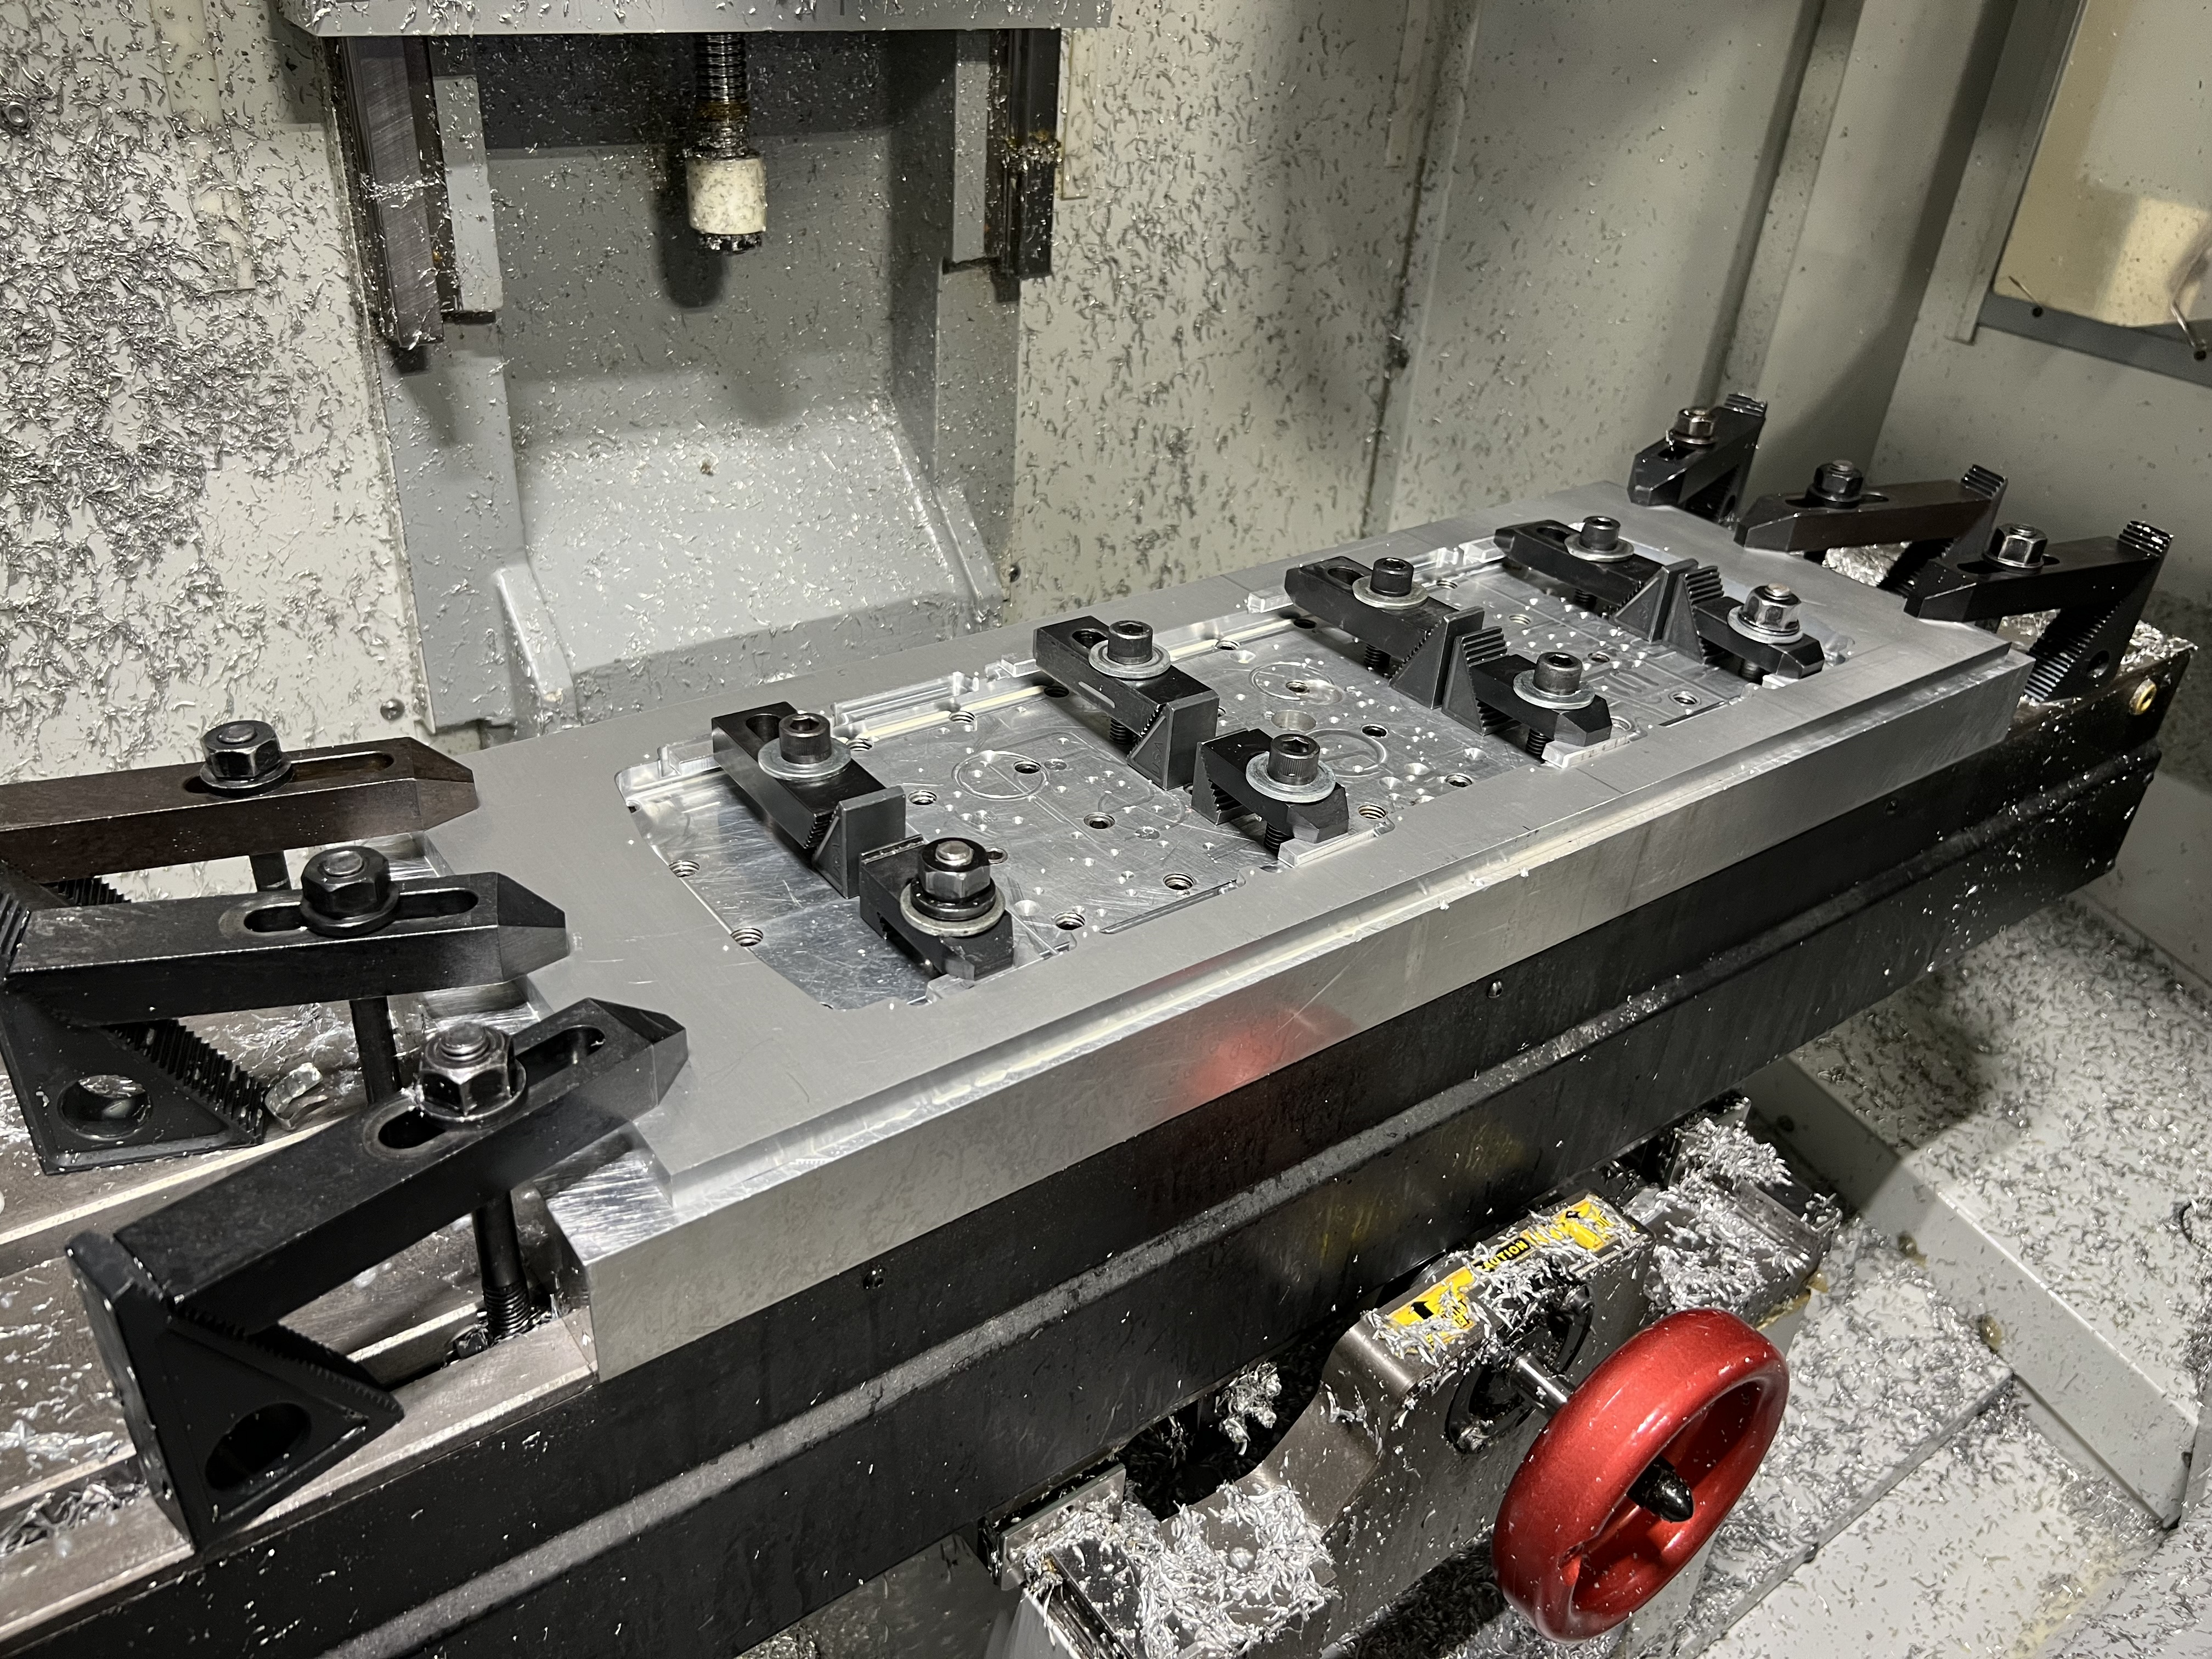
After all of the additional parts have been machined and removed, the workholding toe-clamps were moved from the outer perimeter of the aluminum to the inside. Most of the features on the main structural aluminum piece would be machined with the toe-clamps on the inside. The same coordinate system could be used because the workpiece was not moved. With the workholding on the inside perimeter of the workpiece where the additional aluminum pieces were machined out of, the outside of the workpiece could be machined. After an end mill roughed out and finished all of the outer features, a ball mill was used to make an oversized chamfer along the outer perimeter. A chamfer mill was used to deburr all of the other machined edges. It was very interesting to watch the machine move and see the chips fly as the final design emerged from a solid block of aluminum.
When machining the polycarbonate panel and hdpe footpads, I switched out the carbide tooling I was using to machine aluminum with high speed steel tooling (HSS). Tool stiffness is less important when machining relatively soft plastic. While carbide tooling is stiffer than HSS tooling, the cutting edge of carbide tooling cannot be as sharp as HSS tooling. I machined the HDPE footpads first. I specially designed a concave surface that would be machined into the HDPE footpads for the most comfort when riding. The HDPE workpiece was roughed very quickly with a large ½” HSS end mill, then finished with a ⅜” HSS ball mill. Tabs were added to the perimeter of the HDPE parts so that they would stay in place when machined. The tabs were easily cut away with a box cutter. The polycarbonate panel was cut in a single operation with a ¼” HSS end mill.
Luckily there were no major problems when manufacturing. Everything fit together on the first try without issue. I was taking a risk by machining everything out of a single piece of stock, but it paid off because I only had to set up a few operations. No end mills were broken in the making of this electric longboard.
Spot welding and soldering the battery pack was very straightforward and much easier than the previous battery pack build. Mostly in part to the new spot welder I made after doing a little dumpster diving for a used microwave. Just kidding, I went to the closest junkyard to pick up a gently used microwave. Instead of using a car battery as a power source and a go-cart starter solenoid as the timing relay, I made the new spot welder with a microwave transformer and solid state relay (SSR). My previous spot welder was inconsistent as the voltage from the car battery decreased after use. The microwave transformer was more consistent. I had to use an angle grinder to open the microwave transformer to replace the secondary windings with very thick gauge wire. A limit switch and arduino were used to precisely control the SSR timing. I was so happy with how well this spot welder set up worked that I decided to make a quick mdf box to enclose everything. I’m planning to use this spot welder for future li-ion battery pack projects.
After riding this new electric longboard for the first time, the stiffer aluminum deck was jarring at first compared to the bamboo and fiberglass deck. However after riding for some more, the increased control and steering feedback from the stiffer deck felt really good. I could carve and turn much harder and more confidently with the aluminum deck. Higher speed stability was also significantly better with the aluminum deck. I can see now why electric longboard racers prefer stiff carbon fiber decks over flexible bamboo and fiberglass decks. Since my main use for electric longboards is for commuting, I think that the increased turning control and stability with a stiff aluminum deck results in a safer commute than the increased comfort of a flexible bamboo and fiberglass deck. Especially on the dangerous roads with unpredictable cars, bikes, scooters and pedestrians, I need all the control and maneuverability I can get. I feel especially safe riding this longboard, because I designed the main structural elements myself and made sure that it would not fail.
Skills Enhanced
- CAD (PTC Creo Parametric)
- FEA (PTC Creo Simulate)
- CAM (Fusion 360)
- CNC Milling
- Spot Welding
- Skateboarding